bds-agent — Headless Orchestration
bds-agent is an agentic CLI for consuming BDS market data without relying on a local MCP subprocess. It calls the metered full-node resolver routes directly, translates natural-language queries to YAML recipes, and supports wallet-funded automated signup and top-up.
Its implementation is available at github.com/powerloom/bds-agent-py. The published package on PyPI is bds-agent.
Install
Preferred — PyPI
With pip (use a virtual environment when your system Python is managed — for example python -m venv .venv && source .venv/bin/activate before install):
pip install bds-agent
Or with uv — installs from PyPI into an isolated tool environment (similar to pipx) and places bds-agent on your PATH (often ~/.local/bin):
uv tool install bds-agent
After an upgrade, refresh with uv tool install --force bds-agent if the CLI version looks stale. Confirm either install with bds-agent --help.
From source (contributing, or when you need the bundled examples/ tree)
git clone https://github.com/powerloom/bds-agent-py.git
cd bds-agent-py
uv sync
uv tool install .
This places bds-agent on your PATH. For project-local use without global install:
uv sync
uv run bds-agent ...
Summary of steps:
- List available plans
- Setup EVM wallet credentials
- Pay for credits
- Check balance
- Setup LLM backend
- Test run and execute a query
- Run a recipe with verification
- Optionally, top-up credits
Signup and credits
bds-agent uses the same metering service as all other BDS paths (https://bds-metering.powerloom.io).
Reference: Metering & API Keys
CLI signup (free — 2 credits included)
bds-agent signup
The CLI prompts for email and agent name, opens the browser verification page, waits for you to complete Turnstile, then saves the API key to ~/.config/bds-agent/profiles/<profile>.json.

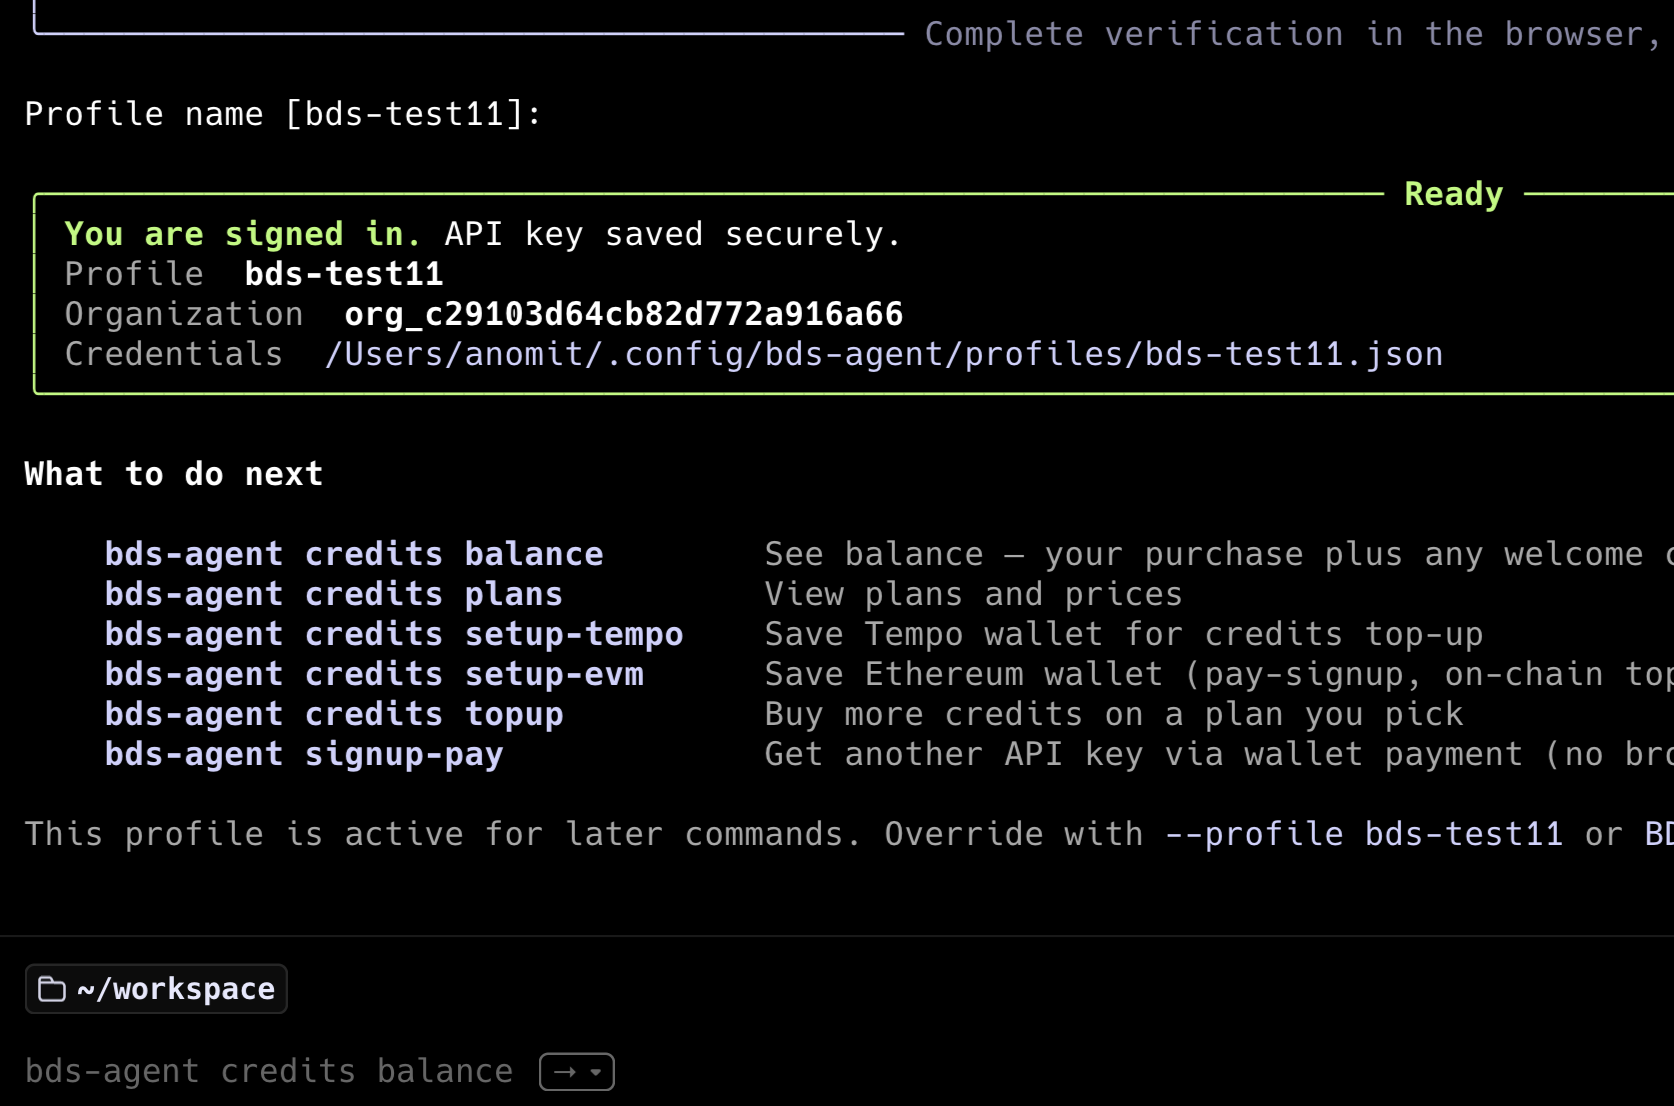
Every signup receives 2 free credits — no wallet, no payment, no tokens required.
Automated pay-signup (no browser, wallet only)
bds-agent credits plans
bds-agent credits setup-evm
bds-agent signup-pay --plan-id <id> --chain-id <chain> --token-symbol <SYMBOL>
bds-agent credits balance
- The plans are returned from the metering service and look like this:
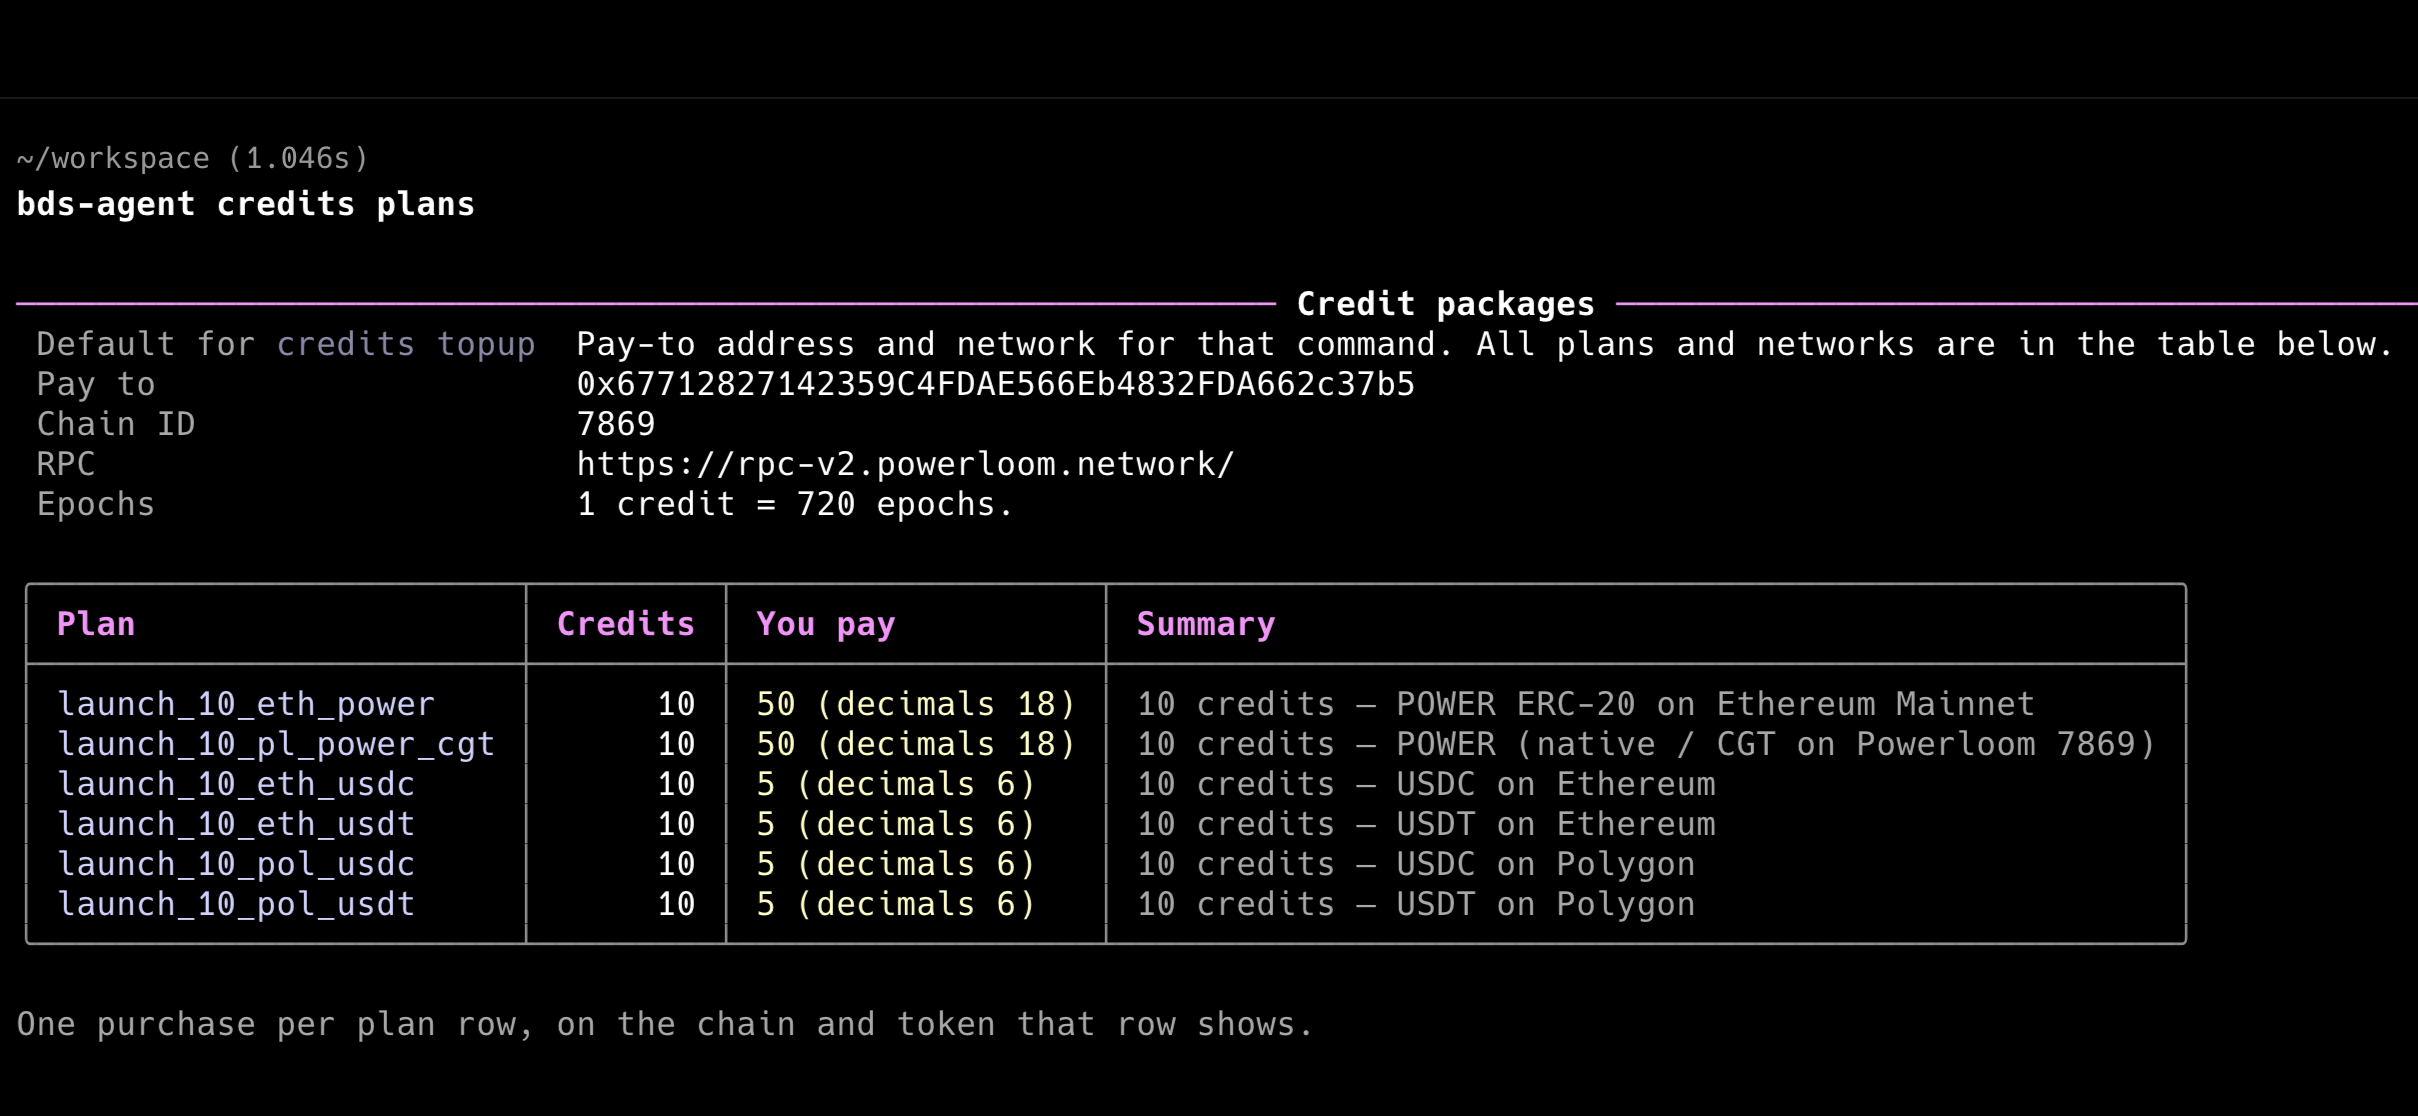
It is recommended to sign up with plans that use $POWER as the payment token on Powerloom mainnet chain as it is the most efficient way to pay for credits and is often heavily discounted because of the low gas fees and processing overhead without requiring bridging of tokens on Powerloom mainnet.
- The
setup-evmstep writes wallet credentials to~/.config/bds-agent/profiles/<profile>.evm.env. Thesignup-paystep executes the on-chain payment and claims the API key in a single command.
There is a setup-tempo command as well to pay for credits using a Tempo wallet that is not supported fully yet on their mainnet. Please use the setup-evm command instead.
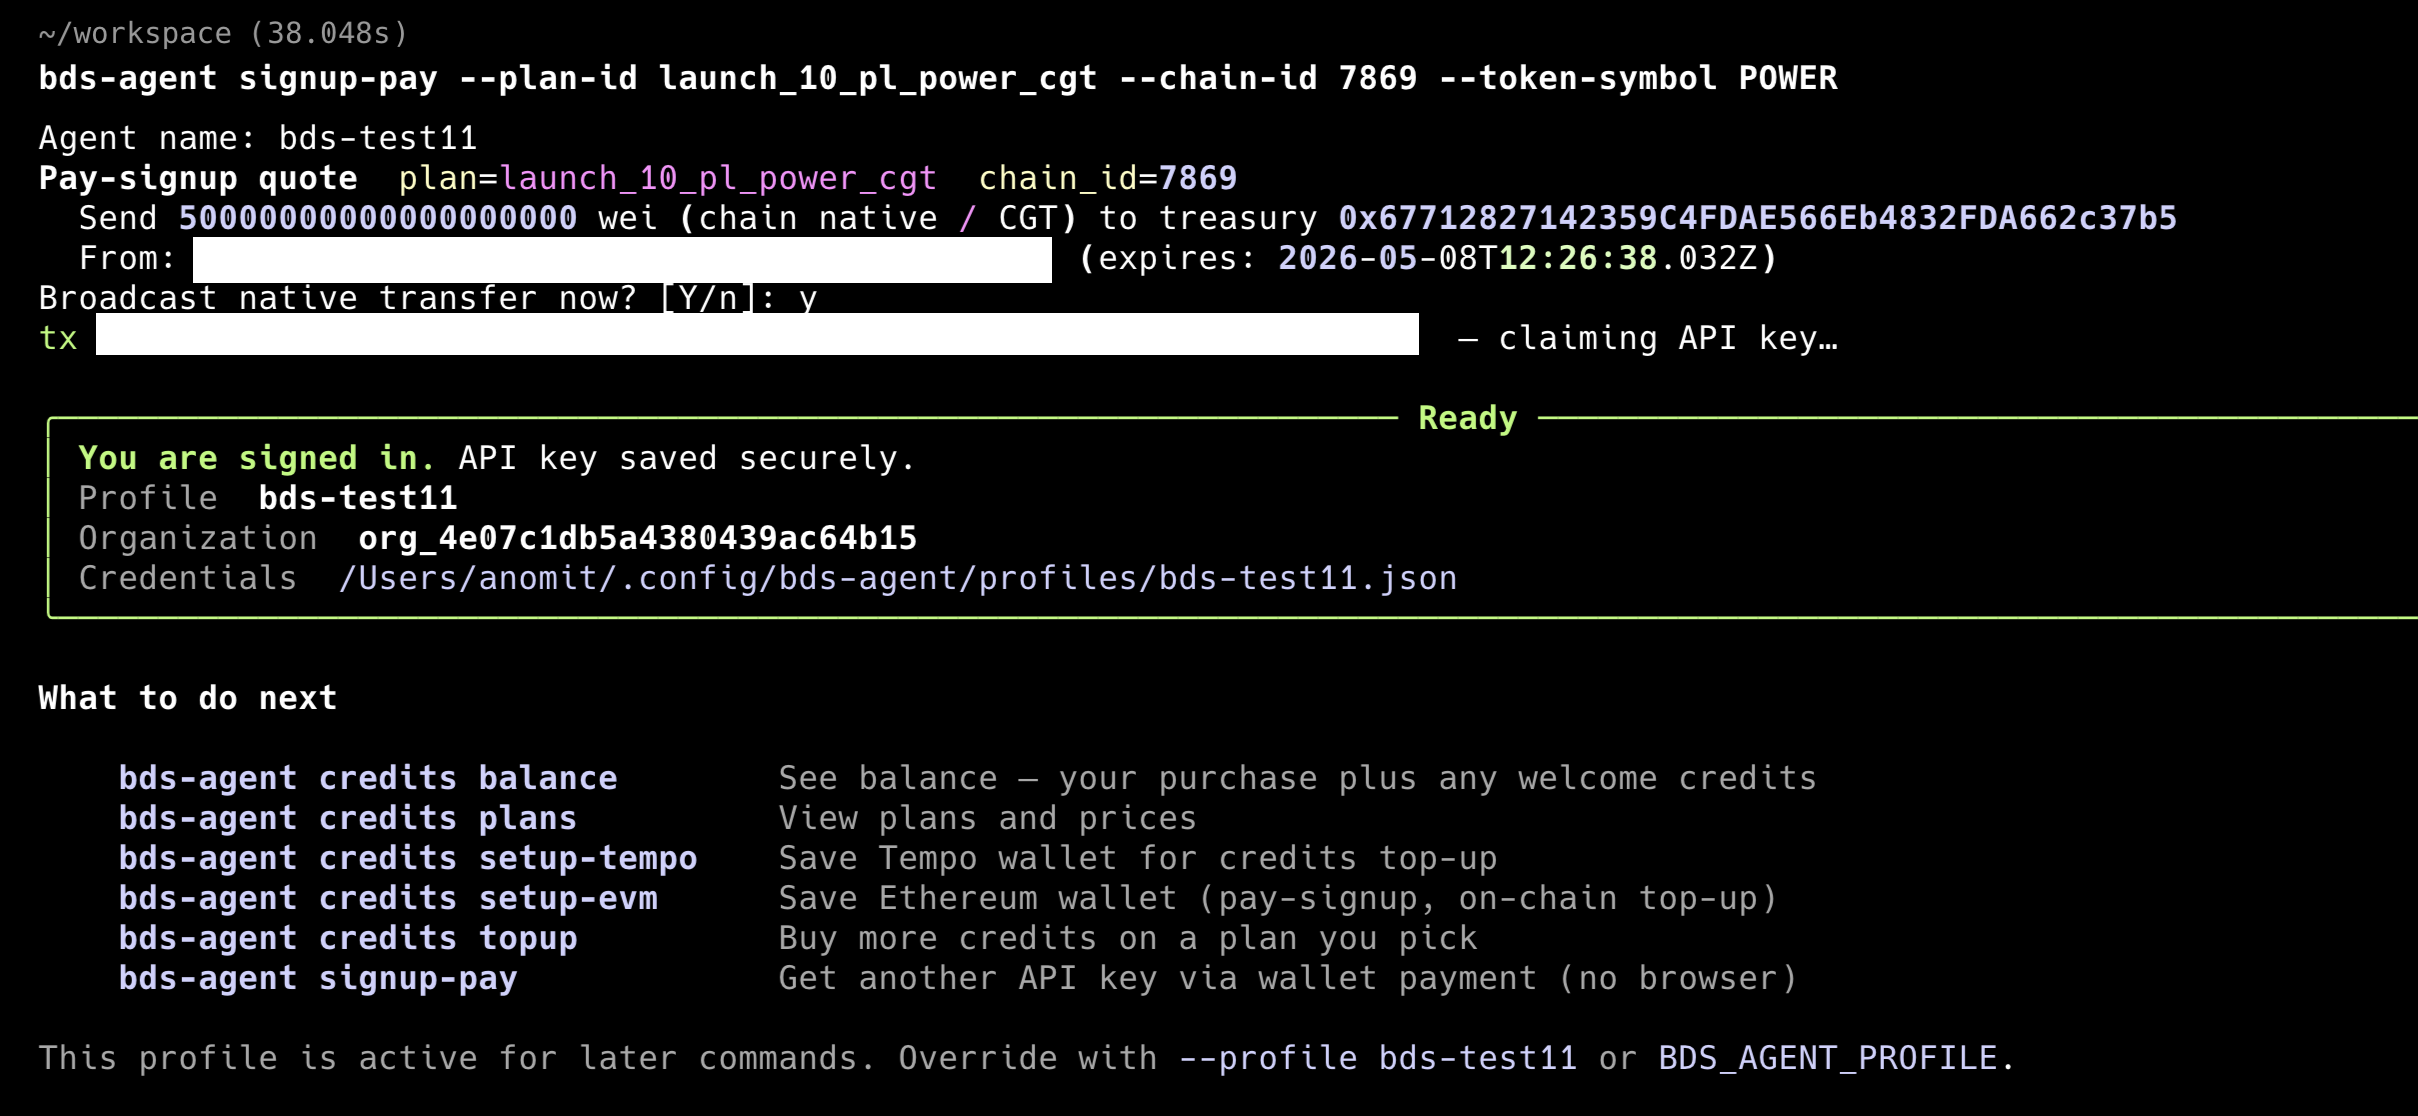
For example, to pay by $POWER on Powerloom mainnet, which is an EVM chain with chain id 7869, we set it up with a private key of a funded wallet. The rest of the prompts can be left to their defaults by pressing Enter, as noted in the [default] prompts.

- The
signup-paystep executes the on-chain payment and claims the API key in a single command. Here we use thelaunch_10_pl_power_cgtplan, which is a 10 credit plan that costs 50 $POWER at the time of writing this guide.
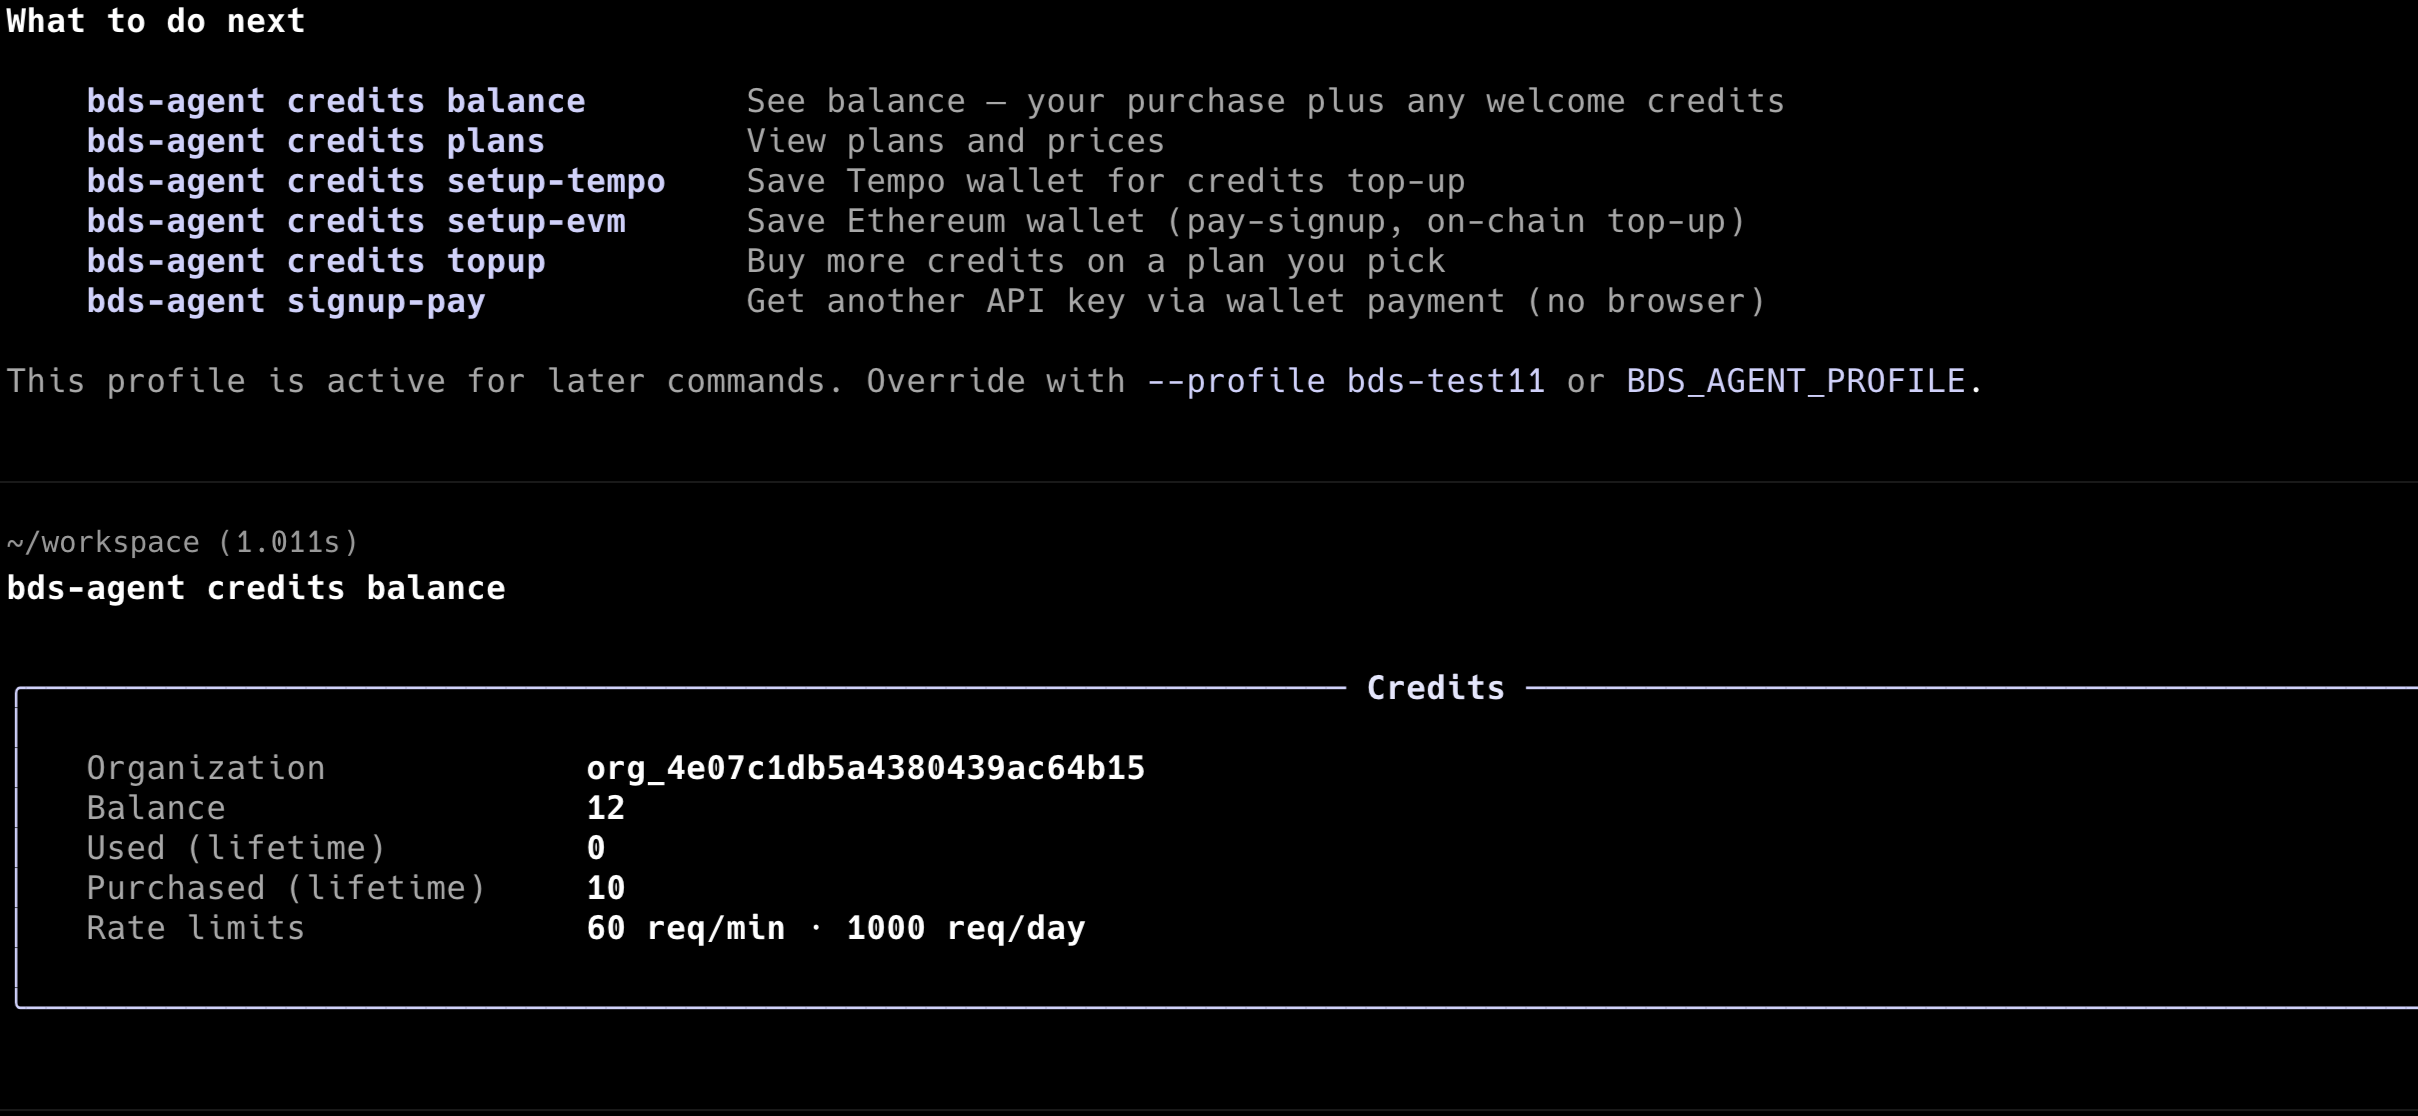
- Check the balance to see the credits available.
On every signup, you receive 2 free credits. And the above payment of 50 $POWER adds 10 credits to your balance. So you have 12 credits available.
Profile and configuration
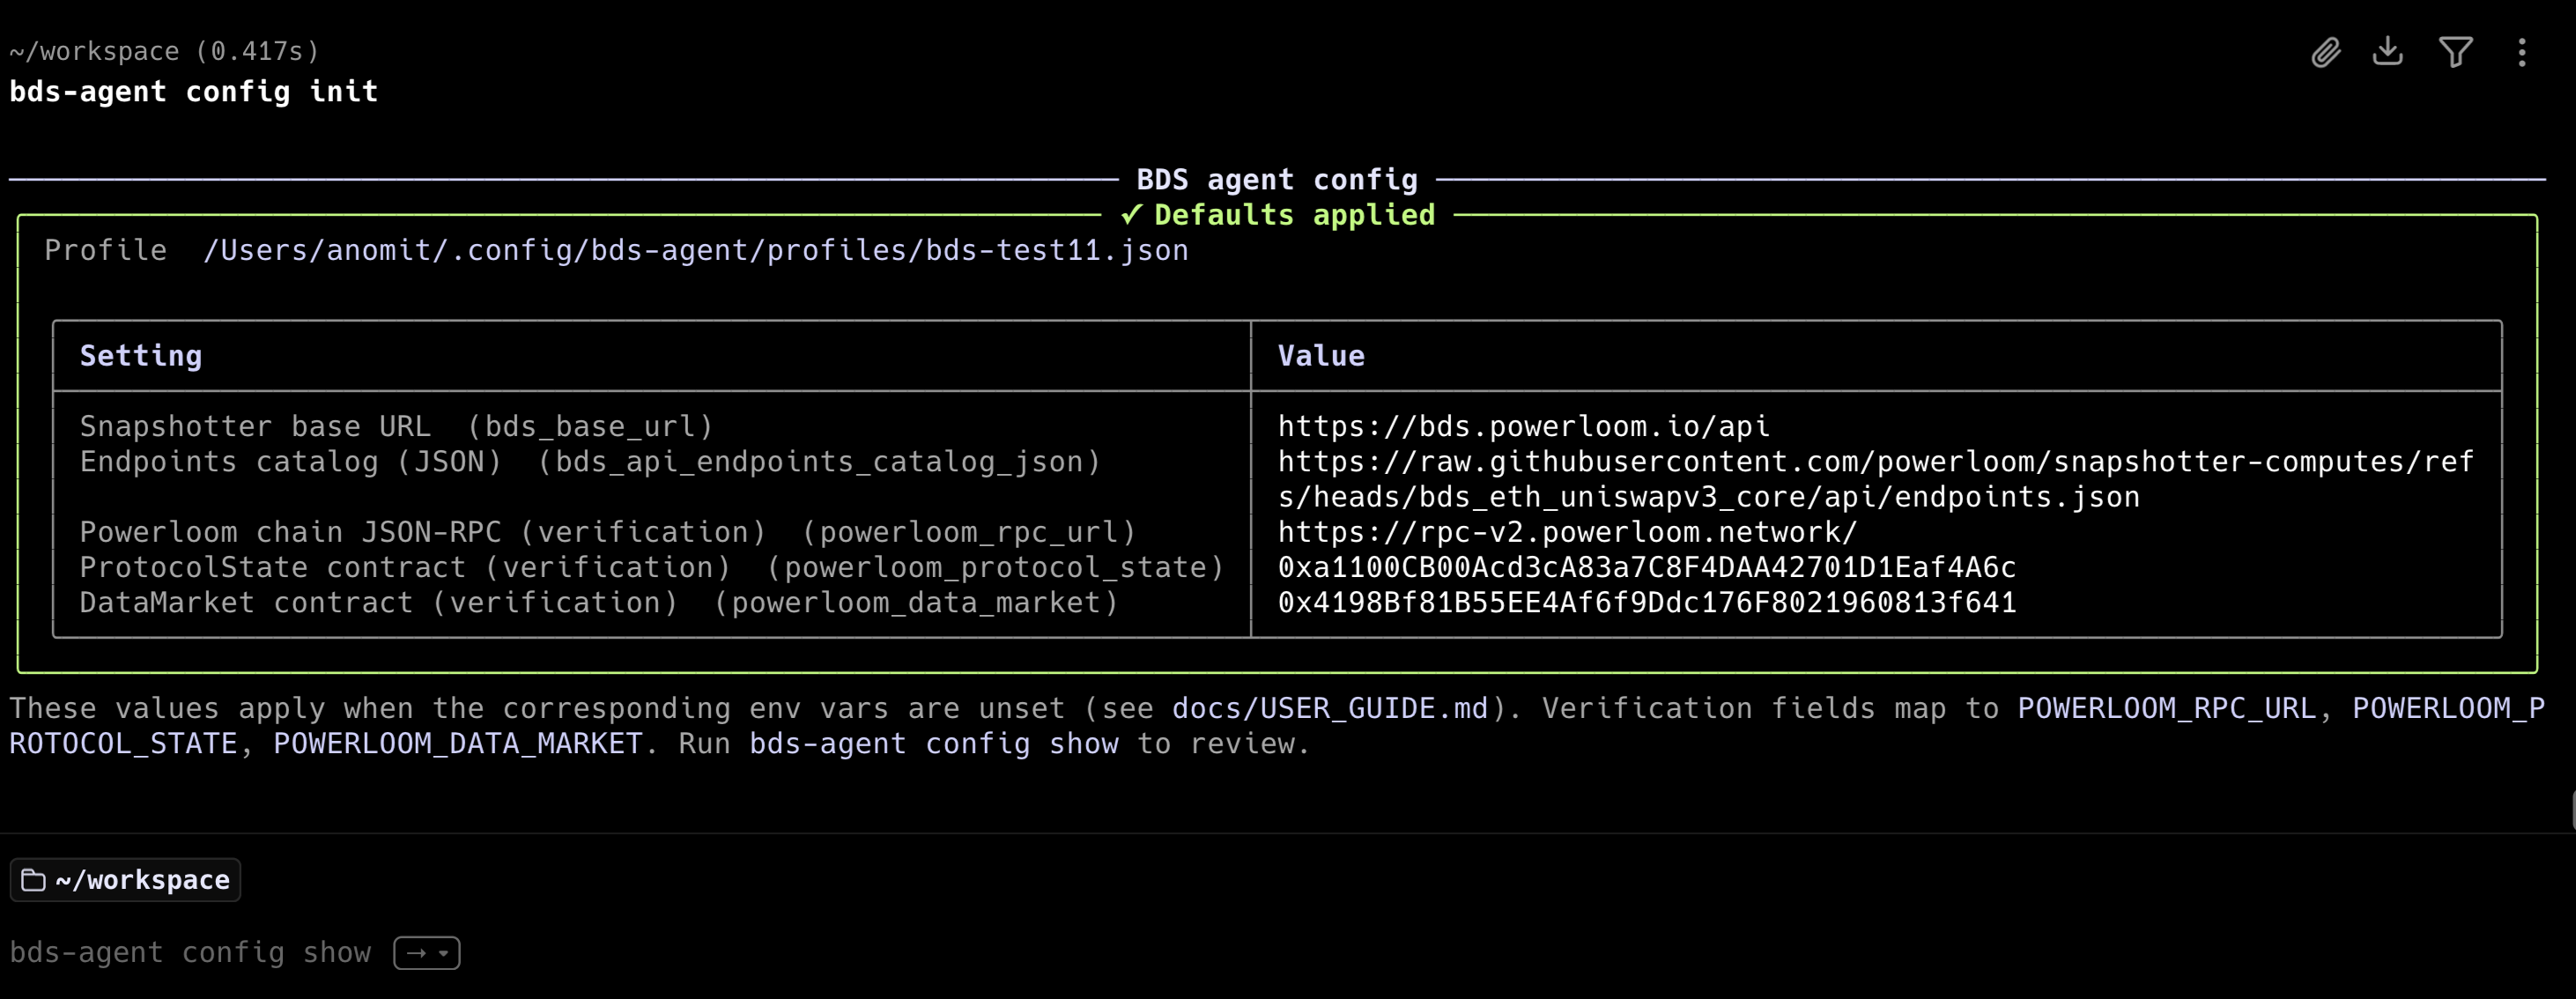
After signup, run initial config to write BDS defaults to the active profile:
bds-agent config init
This sets bds_base_url (the full-node resolver HTTP origin), the endpoint catalog URL (resolved from the BDS market’s endpoints.json in snapshotter-computes), and Powerloom chain verification defaults. It does not overwrite keys that are already set.
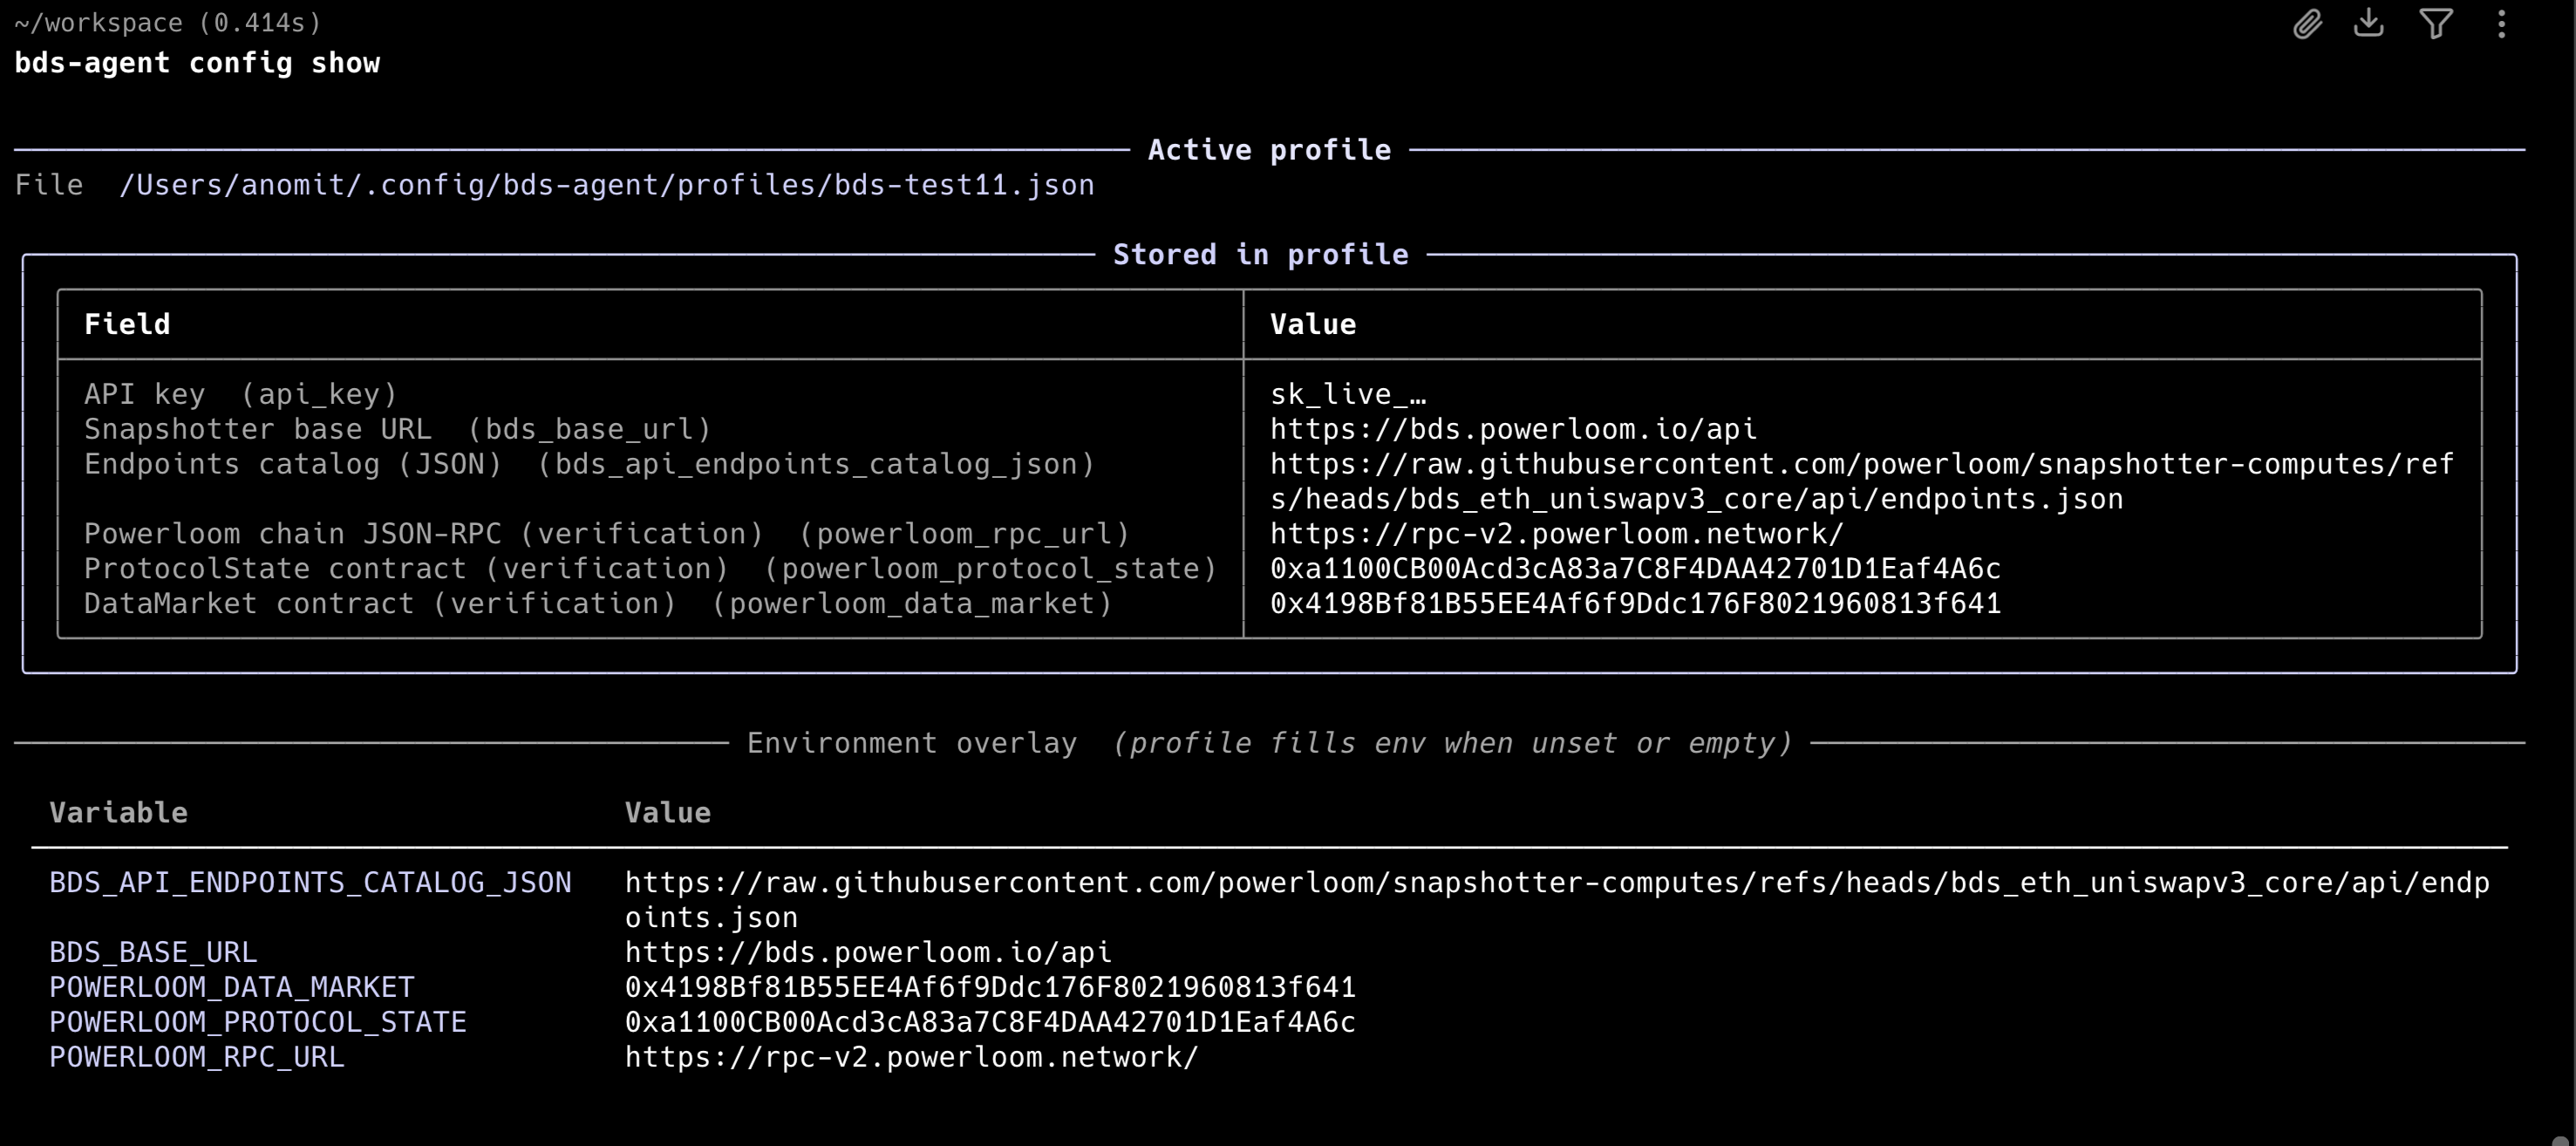
Inspect the active profile:
bds-agent config show
LLM backend (for query and create)
bds-agent query and bds-agent create require an LLM backend to translate natural language. The CLI auto-detects from API keys in the environment:
Available LLM backends
anthropic- Anthropic Messages APIopenai- OpenAI Chat Completionsollama- Local Ollama if runninglocal- Local GGUFapfel- Apple Intelligence
bds-agent llm list
  anthropic     ready
  openai        not configured
  ollama        not configured
  local         not configured
  apfel         not configured
At the time of writing this guide, only the anthropic and local ollama backend is supported.
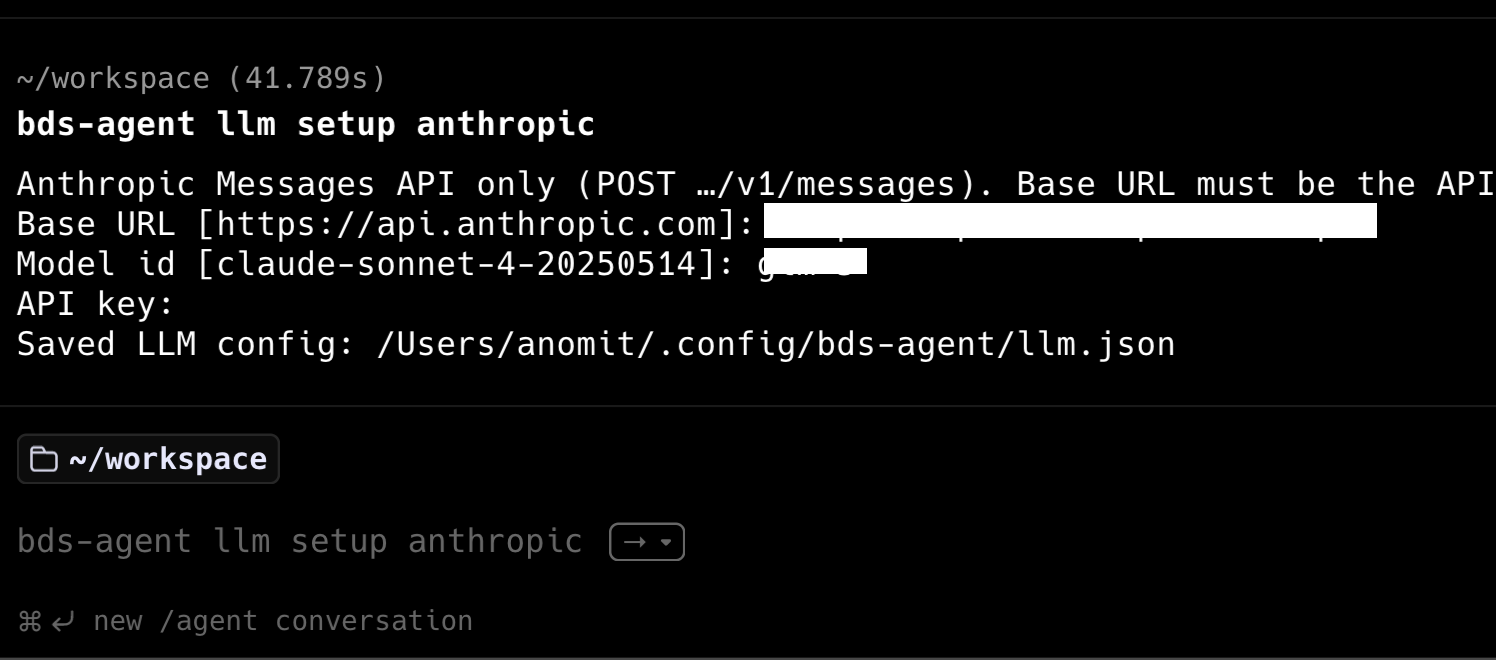
Setting the LLM backend
bds-agent llm setup anthropic
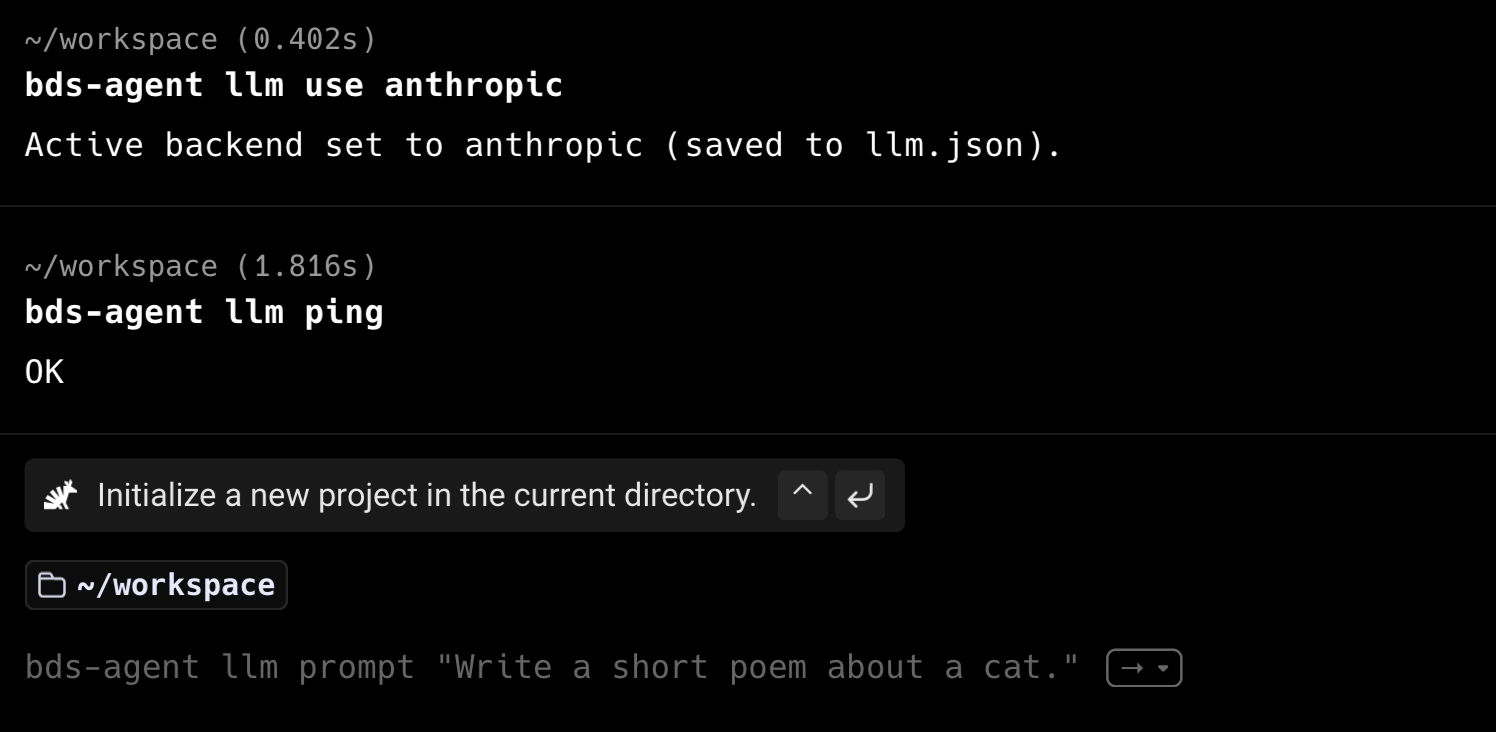
bds-agent llm use anthropic
Once the backend is set, you can test it by running:
bds-agent llm ping
bds-agent run on an existing recipe does not require an LLM backend.
Consuming data: query, create, run
bds-agent provides three commands for consuming BDS data. None of these require an MCP server.
bds-agent query — natural language to HTTP
Translate a natural-language question into a resolver route call and return the result:
bds-agent query "trade volume of pool 0xc7bBeC68d12a0d1830360F8Ec58fA599bA1b0e9b which is WETH/USDT in last hour" --execute
The agent will then translate the natural language question into a resolver route call and return the result as well if the --execute flag is set.
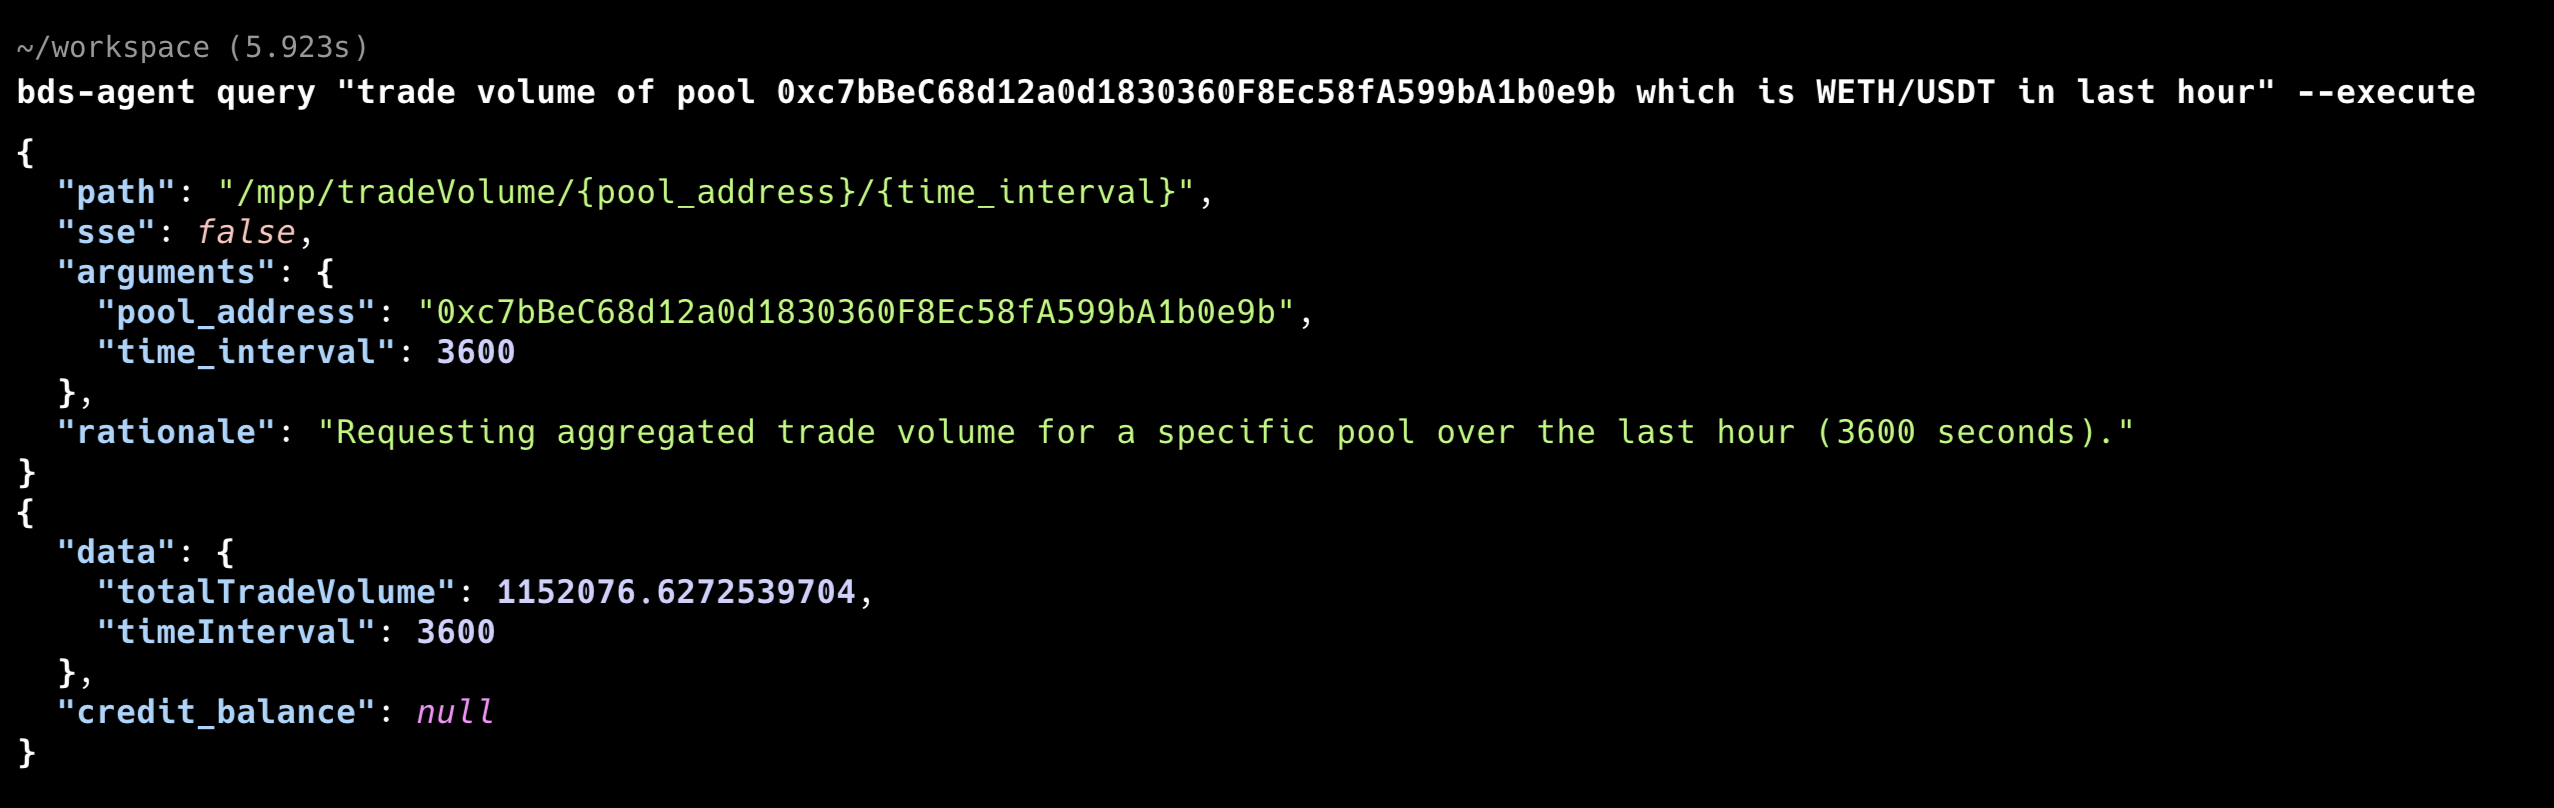
Presently, the credit balances are not returned by the resolver node. So you will need to check the balance after the query is executed.
bds-agent credits balance

╭────────────────────────────────────────────────────────────────── Credits ───────────────────────────────────────────────────────────────────╮
│                                                                                                                                              │
│   Organization             org_4e07c1db5a4380439ac64b15                                                                                      │
│   Balance                  11.998611111111112                                                                                                │
│   Used (lifetime)          0.001388888888888889                                                                                              │
│   Purchased (lifetime)     10                                                                                                                │
│   Rate limits              60 req/min · 1000 req/day                                                                                         │
│                                                                                                                                              │
╰──────────────────────────────────────────────────────────────────────────────────────────────────────────────────────────────────────────────╯
You can observe the credit balance has been decremented by the cost of that request (depends on the route’s credit_weight in the BDS endpoint catalog × the deployment’s CREDIT_PER_EPOCH base, or a flat stream rate for /mpp/stream/...). Refer to Metering & API Keys — How credits are consumed for the formula and premium-route table.
bds-agent create — natural language to YAML recipe
Generate a YAML recipe file from a description:
bds-agent create "Alert me when a single swap exceeds $1k on any indexed pool"

✓ Wrote /Users/anomit/workspace/gen-yaml/large-swap-alerts.yaml
Run with: bds-agent run /Users/anomit/workspace/gen-yaml/large-swap-alerts.yaml  (optional: --profile NAME)
This writes a recipe YAML file within the gen-yaml directory that you can review and run with bds-agent run.
A recipe YAML specifies the data source endpoint, rules (filters, thresholds), and sinks (Telegram, Discord, stdout). The runner executes the recipe statelessly on each invocation, which makes it well-suited for cron-style scheduled runs.
For on-chain verification of each response, set verify: true in the recipe. The runner will call ProtocolState.maxSnapshotsCid to confirm the returned CID matches the finalized state. See Verification in Agent Workflows for detail.
bds-agent run — execute a YAML recipe
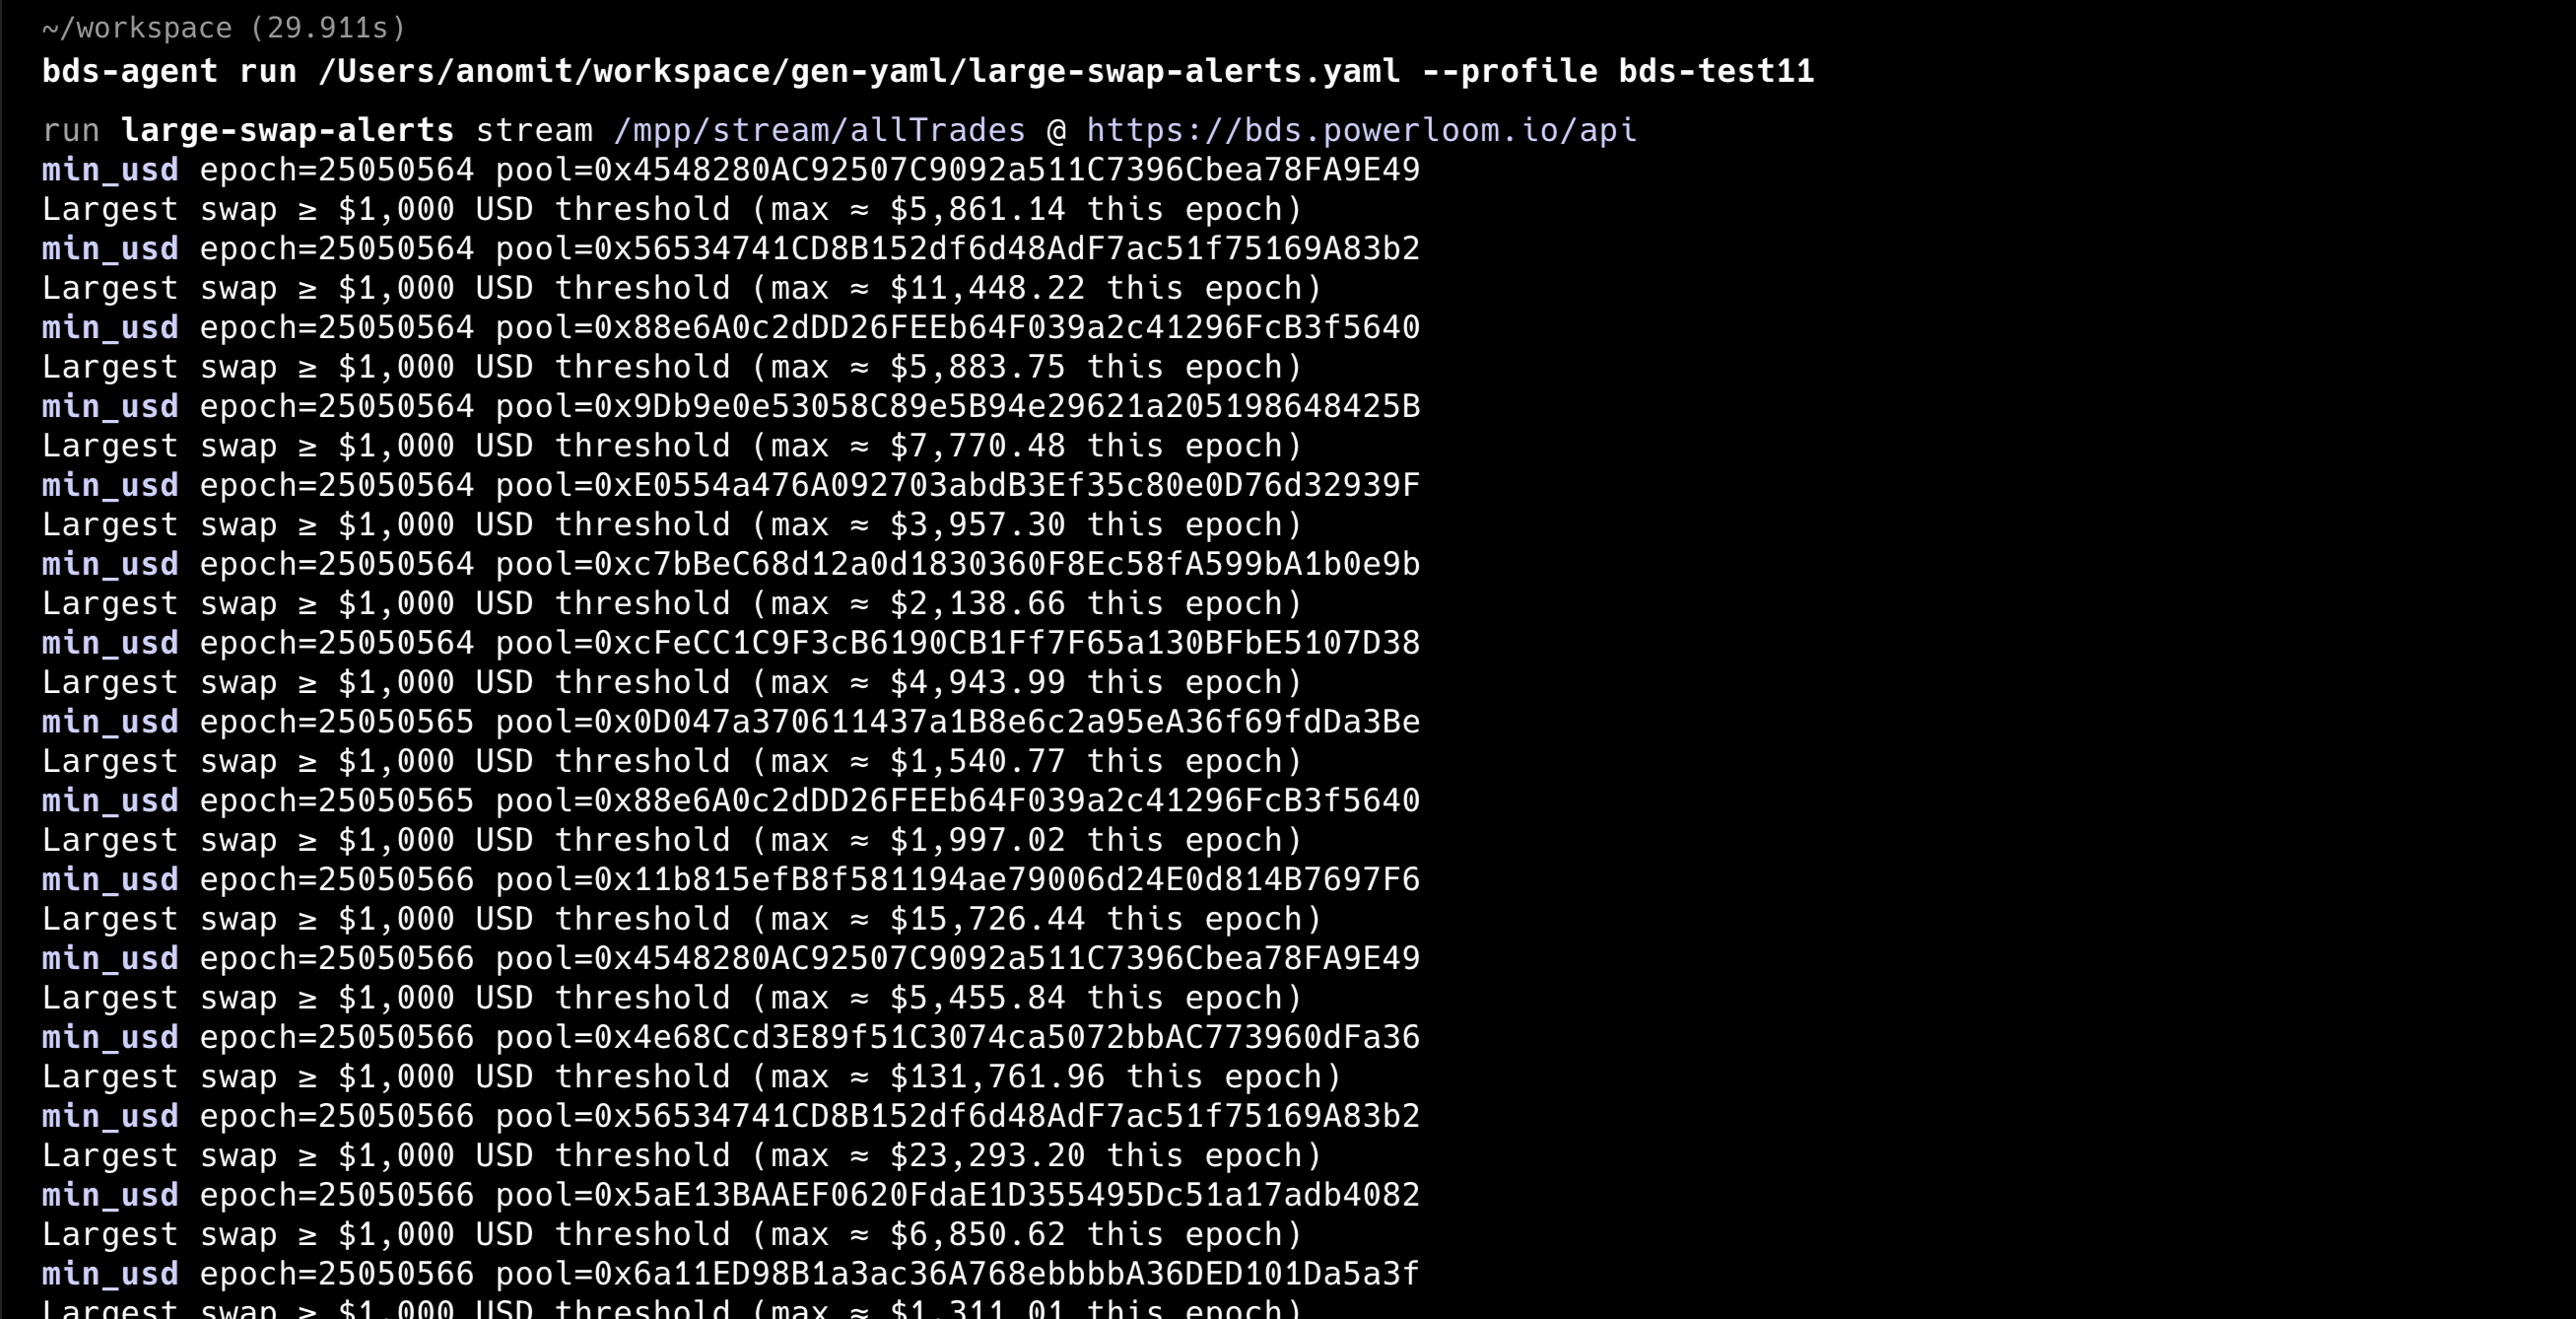
Run the recipe with the --profile flag to specify the profile to use. Without it, the calls to the resolver node will fail as the API key is not set. In the following example, we use the bds-test11 profile which was created in the Automated pay-signup section.
bds-agent run gen-yaml/large-swap-alerts.yaml --profile bds-test11
Executing pre-packaged recipes
The bds-agent-py repository ships sample recipes under examples/. If you installed from PyPI only, fetch an example file instead of cloning:
curl -sLO https://raw.githubusercontent.com/powerloom/bds-agent-py/main/examples/dex-alerts.yaml
bds-agent run dex-alerts.yaml --profile bds-test11
From a source checkout:
cd bds-agent-py
bds-agent run examples/dex-alerts.yaml --profile bds-test11
The bundled recipe examples/dex-alerts.yaml streams indexed DEX swaps and applies two alert rules. Environment and profile follow the same pattern as elsewhere in this guide (BDS_BASE_URL, BDS_AGENT_PROFILE).
| Area | YAML / value | What it does |
|---|---|---|
| Source | type: bds_stream | Subscribes to the BDS SSE stream (live trade payloads per epoch). |
endpoint: /mpp/stream/allTrades | All indexed pools’ swap stream. | |
base_url: ${BDS_BASE_URL} | Resolver / data API origin. | |
| Auth | profile: ${BDS_AGENT_PROFILE} | API key via the named profile. |
| Sinks | stdout | Prints alerts to the terminal; replace with Discord/Telegram sinks in your own copy if needed. |
| Verification | verify: false | Skips ProtocolState CID checks per batch (faster for demos). Set verify: true for finalized-state verification—see Verification in Agent Workflows. |
| Lifecycle | reconnect: true, reconnect_delay: 5 | After stream errors, wait 5 seconds and reconnect. |
max_reconnects: 0 | In this recipe schema, 0 = unlimited reconnect attempts after errors. |
Rules: Each rule runs independently per pool; either rule or both can emit alerts in the same epoch when conditions match.
| Rule | Parameters | Behavior |
|---|---|---|
min_usd | threshold: 50000 | Emits when any single swap is ≥ $50,000 USD (largest qualifying trade is reported). |
volume_spike | multiplier: 3.0, window_epochs: 10 | Emits when a pool’s epoch volume is ≥ 3× the rolling average of its previous 10 epochs (per pool). |

MCP stdio (optional)
bds-agent can also expose BDS tools as a local MCP stdio server:
bds-agent mcp
This is the stdio equivalent of the hosted bds-mcp-server and works with Cursor, Claude Desktop, and similar clients that start MCP servers as subprocesses. It uses the same endpoint catalog and API key as bds-agent run.
The key difference from the hosted server:
bds-agent mcp (stdio) | Hosted bds-mcp-server | |
|---|---|---|
| Transport | stdio (child process) | HTTP SSE |
| Deploy | Client starts the process | Runs as a service |
| Env | Profile / env in the child | Bearer header on every HTTP request |
For laptop use in Cursor or Claude Code, the stdio path is adequate. For agents running in remote environments or frameworks that cannot spawn child processes, use the hosted server.
Pulse trader (bds-agent trade)
Pulse is a self-contained momentum trader: it subscribes to the BDS /mpp/stream/allTrades SSE feed, scores each epoch with price + volume + flow confluence, and (when not in dry-run) swaps on Ethereum mainnet via Uniswap V3 SwapRouter. Production setups use --multi-pool and the USD Price Feed (--price-source usd, default) so alt USDC pairs are not drowned out by flat trade-implied prices on WETH/USDC.
Prerequisites: same as the rest of this guide — profile with api_key, bds-agent config init, and credits. Trading uses a separate wallet from billing.
File (profile pulse) | Purpose |
|---|---|
profiles/pulse.json | API key, bds_base_url, catalog URLs |
profiles/pulse.evm.env | Billing — signup-pay, on-chain credit top-up |
profiles/pulse.trade.env | Trading — swaps only (trade setup-evm) |
profiles/pulse.trader.json | Open positions (one LONG per pool) |
profiles/pulse.trades.jsonl | Trade log |
Use the same --profile on every command. Do not swap from the billing wallet.
Quick start (dry-run → live)
# After signup + config init (sections above)
bds-agent trade setup-evm --profile pulse

# Phase 1 — paper trades, no on-chain swaps
bds-agent trade run --profile pulse --dry-run --multi-pool --verbose

# Phase 2 — live (fund trading wallet: USDC for size + ETH for gas)
bds-agent trade run --profile pulse --multi-pool --price-source usd --size 25
Fund profiles/<name>.trade.env only. First live swap per token may need a one-time ERC-20 approve before the router swap.
Multi-pool mode (--multi-pool)
Each BDS epoch (~12s on ETH mainnet):
- Ingest per-pool trades from the shared
allTradesstream - Run Pulse on each watchlist pool (USD window when
--price-source usd) - Open up to
--max-open-positionsconcurrent LONGs (default 5 with--multi-pool, 1 without) — one position per pool - Live: USDC ↔ base token on each selected pool (not WETH-only)
Watchlist comes from GET /mpp/dailyActivePools (default top 40 pools, 5m interval) and refreshes about every 30 epochs.
bds-agent trade run --profile pulse --dry-run --multi-pool --verbose \
  --active-pool-limit 40 --active-interval 300 --price-source usd --max-open-positions 5
Entry signal defaults
| Flag | Default | Meaning |
|---|---|---|
--price-source | usd | usd = /mpp/tokenPrices/... per epoch; trades = swap-implied only |
--price-move | 0.15 | Min price change % in the lookback window |
--volume-burst | 2.0 | Short-window volume vs trailing baseline |
--flow-imbalance | 30 | Directional flow as % of volume |
--window-minutes | 5 | Signal lookback |
--size | (required live) | USDC notional per entry |
--slippage | 0.01 | Uniswap amountOutMinimum floor (no silent relax to zero) |
--max-open-positions | auto | 0 = 5 with --multi-pool, else 1 |
--daily-loss-limit | 50 | Block new entries if today realized P/L ≤ −$50 (UTC) |
--reentry-cooldown-minutes | 0 | Optional: block all new entries N minutes after a live exit |
--signal-cooldown-minutes | 0 | Optional: per-pool spacing after a LONG fires |
Dry-run → live: paper positions do not block live startup; starting live clears paper state. Use --verbose during validation — one heartbeat line per epoch (gates, px=, burst, imbalance, position state).
Exit strategies (defaults on)
Disable any rule with --no-exit-*. First match wins: stop-loss → take-profit → trailing-stop → time-based → signal-reversal.
| Flag | Default | Role |
|---|---|---|
--exit-stop-loss-pct | 2.0 | Cut if price falls X% below entry |
--exit-take-profit-pct | 1.0 | Take if price rises X% above entry |
--exit-trailing-pct | 2.0 | Exit X% below peak since entry |
--exit-hold-minutes | 10 | Max hold time |
--exit-signal-reversal | on | Exit on Pulse SHORT on the entry pool |
Metering (Pulse)
| Route | When |
|---|---|
/mpp/stream/allTrades | Once per trade run session (per SSE connection) |
/mpp/tokenPrices/... | Each epoch per watched token when --price-source usd |
/mpp/dailyActivePools | Watchlist refresh (~every 30 epochs) |
There is no separate “Pulse fee” — only catalog-priced BDS routes. See Metering & API Keys → How much each call costs. On HTTP 402 (credits exhausted), USD fetches fail fast with a top-up hint; the trader stops rather than using stale prices.
bds-agent credits balance
bds-agent credits usage by-endpoint --days 7 --limit 50
Ops commands
bds-agent trade setup-evm --profile pulse
bds-agent trade status --profile pulse
bds-agent trade history --profile pulse
bds-agent trade pnl --profile pulse
bds-agent trade exit --profile pulse              # all open
bds-agent trade exit --profile pulse --pool 0x…   # one pool
Full CLI reference (verbose heartbeat legend, risk controls, guard composition): bds-agent-py — docs/TRADE.md.
Threshold Guard (bds-agent guard)
Bracket trading on one USDC-quoted Uniswap V3 pool using BDS spot USD prices (GET /mpp/token/price/{token}/{pool}). Complements Pulse above: Guard is single-pool percent brackets and optional dip re-entry; Pulse is stream confluence across many pools.
Setup: same profile API key and swap wallet as Pulse — bds-agent trade setup-evm --profile NAME writes profiles/<NAME>.trade.env.
Spot mode (default)
| Flag | Default | Role |
|---|---|---|
--enter | on | Swap --size USDC → base at BDS spot on start |
--take-profit-pct | 0.03 | Exit when price rises +X% above entry |
--stop-loss-pct | off | Optional exit when price falls −X% below entry |
--reentry-retrace-pct | 0.5 | After exit, re-buy on cross down through a level below the exit |
--reserve-max-minutes | 0 | Stop the guard process in USDC if no dip re-entry within N minutes (0 = poll forever) |
--pool / --token | — | Pool and base token (pool saved to .guard.json) |
bds-agent trade setup-evm --profile myguard
bds-agent guard run --profile myguard \
  --pool 0xE0554a476A092703abdB3Ef35c80e0D76d32939F \
  --token 0xC02aaA39b223FE8D0A0e5C4F27eAD9083C756Cc2 \
  --size 5 --take-profit-pct 0.003 --stop-loss-pct 0.002 \
  --reentry-retrace-pct 0.5 --reserve-max-minutes 30 --poll 5
Actions are edge-triggered (fire on crosses between polls, not every tick while price sits in a band). After take-profit you hold USDC (reserve); re-entry waits for a dip through reentry_below. If price only trends higher, use --reserve-max-minutes so the CLI exits cleanly and sets guard_exit_reason=reserve_idle_timeout in .guard.json for an outer orchestrator to start the next leg.
Status and P/L: bds-agent guard status reads bracket state (.guard.json). Fills are mirrored into the same profile’s trade log — use bds-agent trade status, history, and pnl.
Explicit USD bands: pass both --threshold-high and --threshold-low instead of percent flags. See the full CLI reference in bds-agent-py — docs/GUARD.md and the orchestrator index in SKILL.md.
SKILL.md — framework-neutral orchestration directives
bds-agent ships a SKILL.md at the repository root. It is a single self-contained file that any orchestrator, autonomous agent, or IDE can fetch at session start to learn the full CLI surface, metering HTTP flow, environment variables, and common mistakes — without reading the full USER_GUIDE.md.
curl -sL https://raw.githubusercontent.com/powerloom/bds-agent-py/main/SKILL.md
SKILL.md covers:
- Session bootstrap (install, version check)
- Metering HTTP as the primary surface:
GET /credits/plans→ pay-signup →GET /credits/balance→POST /credits/topup - Full CLI command table with one-line purpose per command (including Threshold Guard and Pulse trader)
- Environment variables and profile precedence (short form;
USER_GUIDE.mdhas full tables) - Key distinction to avoid broken setups: the metering origin (
BDS_AGENT_SIGNUP_URL, defaulthttps://bds-metering.powerloom.io) is not the same as the BDS data origin (BDS_BASE_URL, e.g.https://bds.powerloom.io/api) - Hosted MCP context:
bds-agent mcpis stdio only; the hosted SSE server athttps://bds-mcp.powerloom.io/sseis a separate service - Common mistakes section (URL confusion, MCP stdout pollution, catalog setup, pay-signup field matching)
- Canonical resource links
For the full operator reference, installation tables, and precedence rules: docs/USER_GUIDE.md.
When to choose this path
- You are integrating into an external orchestration framework (LangGraph, CrewAI, custom agent loop) where spawning a child MCP process is not practical.
- You want a wallet-funded agent that can sign up, pay for credits, and top up without human intervention.
- You prefer YAML-driven recipe execution over tool-per-call MCP patterns.
- You are running in a sandboxed or CI-style environment.
For OpenClaw users who want guided onboarding and MCP tools, see OpenClaw & Hosted MCP instead.
Related pages
Metering & API KeysQuickstart(Path A — OpenClaw)Verification in Agent Workflows