Setting Up and Running the Snapshotter Lite Node
This guide provides instructions for installing and running the Snapshotter Lite Node, covering prerequisites and operational procedures.
The Snapshotter Lite Node can be set up using either the Docker image or by running natively on the local machine. However, using the Docker image is the recommended approach, as it provides the simplest and most reliable method for deployment.
Node Mint is now live at: https://mint.powerloom.network/. For detailed information on our rewards structure, frequently asked questions, and other aspects related to node minting, please visit: https://powerloom.network/mint-docs/.
Follow the step-by-step instructions in the relevant guide to set up your Snapshotter Lite Node. If you need further assistance, refer to our troubleshooting documentation or reach out to us on discord for support.
- It is recommended that the node operates continuously, 24/7.
- If you possess multiple slots, refer to the section on setting up multiple nodes for further details.
We have streamlined the setup process based on your operating system. To begin, please choose your operating system from the tabs provided below.
- For those looking to set up the node on a local Windows or Mac machine, please select the "Windows / MacOS" tab.
- If you are configuring your node on a Linux VPS, select the "Linux" tab and follow the provided instructions to get started.
Setting up the Snapshotter Lite node
- VPS Setup (Linux)
- macOS/Linux
- Windows
- Docker Setup
Deploying a Snapshotter Lite Node on a Virtual Private Server (VPS)
Deploying a Snapshotter Lite Node on a Virtual Private Server (VPS) ensures seamless 24/7 operation without utilizing your local resources.
This section provides instructions for setting up your Snapshotter Lite Node on an Ubuntu VPS.
While you're free to choose any provider, this guide specifically utilizes DigitalOcean for demonstration purposes.
Recommended VPS Providers:
- DigitalOcean
- Hostinger
Hardware Requirements
The Snapshotter Lite Node is designed for minimal hardware demands, allowing it to operate effectively on various setups, including both local systems and cloud-based Virtual Machines.
For users running the node on Virtual Private Servers (VPS), the minimum specifications are:
- RAM: At least 4 GB.
- CPU Core: Minimum of 2 Cores
- Disk Space: A minimum of 40 GB.
- Python: Ensure Python 3.11 is installed.
Step 1: Creating Your VPS
Sign Up/Login: Start creating an account on your VPS provider or log in if you already have one.
Choose an Image: Select Ubuntu as your operating system. We recommend using the latest stable version of Ubuntu for optimal performance.
Select a Plan: Choose a plan that meets the minimum hardware requirements for the Snapshotter Lite Node. A plan with at least 4 GB RAM and 40 GB of disk space is advisable.
Authentication: Set up SSH keys for secure access to your VPS.
Finalize and Create: Choose any additional options, like backups if required. Your VPS will be set up within a few minutes.
Step 2: Accessing Your VPS
- SSH into Your VPS: Use the following command from your terminal/command prompt, replacing
your_vps_ipwith the IP address of your VPS.
ssh root@your_vps_ip
- If you set up SSH keys, you should be logged in without needing a password. Otherwise, you can also set your password for the VPS.
Step 3: Setting Up the Environment
- Update and Upgrade Your VPS:
sudo apt-get update && sudo apt-get upgrade -y
- Install Git:
Git is necessary for cloning the Snapshotter Lite repository. Install it using:
sudo apt-get install git -y
- Install Docker and Docker Compose:
Ensure Docker and Docker Compose are installed. You can install docker on Ubuntu using the following commands:
    # Add Docker's official GPG key:
    sudo apt-get update
    sudo apt-get install ca-certificates curl
    sudo install -m 0755 -d /etc/apt/keyrings
    sudo curl -fsSL https://download.docker.com/linux/ubuntu/gpg -o /etc/apt/keyrings/docker.asc
    sudo chmod a+r /etc/apt/keyrings/docker.asc

    # Add the repository to Apt sources:
    echo \
    "deb [arch=$(dpkg --print-architecture) signed-by=/etc/apt/keyrings/docker.asc] https://download.docker.com/linux/ubuntu \
    $(. /etc/os-release && echo "$VERSION_CODENAME") stable" | \
    sudo tee /etc/apt/sources.list.d/docker.list > /dev/null
    sudo apt-get update
Once the Docker repository is added successfully, let’s install Docker and necessary components by using the below command:
sudo apt-get install docker-ce docker-ce-cli containerd.io docker-buildx-plugin docker-compose-plugin
Step 4: Cloning the Repository and Setting Up the Node
- Clone the Snapshotter Lite Repository:
Navigate to the directory where you want to install the node and clone the repository:
git clone https://github.com/PowerLoom/snapshotter-lite powerloom-testnet
- Navigate to the Directory:
Change to the directory of the cloned repository:
cd powerloom-testnet
Step 5: Running the Node
- Setting up Screen:
The Screen utility allows you to run processes in the background, enabling you to maintain long-running tasks without keeping a terminal window open. To initiate a new Screen session for managing the Snapshotter Lite Node, follow these steps:
Enter the following command to create a new Screen session named "powerloom":
screen -S powerloom
- This command opens a new Screen session, where you can start the Snapshotter Lite Node.
- Once inside the new Screen session, initiate the Snapshotter Lite Node as required.
This approach ensures your node can continue running in the background, even if you disconnect from the terminal session.
- Initialize the Node:
Initiate the snapshotter lite node setup by typing the command in the terminal:
./build.sh
Follow the prompts to enter the required information.
Please do not use your NFT minting wallet to run the snapshotter lite node. The safest approach is to generate and assign a burner wallet. You can generate a burner wallet through any of the tools listed below:
Once generated, make sure you assign your burner wallet on your snapshotter dashboard.
Environment Setup:
After initiating the process, the terminal will prompt you to enter the following information:
During the setup, you'll be prompted to enter the following values:
$SOURCE_RPC_URL: Use any Ethereum Mainnet RPC, such as Ankr, Infura, or Alchemy.$SIGNER_ACCOUNT_ADDRESS: Utilize a burner wallet for the signer account address. Please DO NOT use your main/primary wallet.$SIGNER_ACCOUNT_PRIVATE_KEY: Use the private key from your burner wallet.$SLOT_ID: To assign your node to a specific slot, please provide the corresponding Slot ID or NFT ID. You can locate your NFT ID within your transaction details on PolygonScan.
After entering these details, the node will start running the background processes.
If you want to exit your screen, type the command in the terminal:
CTRL+A+D
Ensure your node is running correctly, and check the logs for any errors or confirmations of successful operations.
Everytime you restart the node, you should have a log message similar to the one shown below.
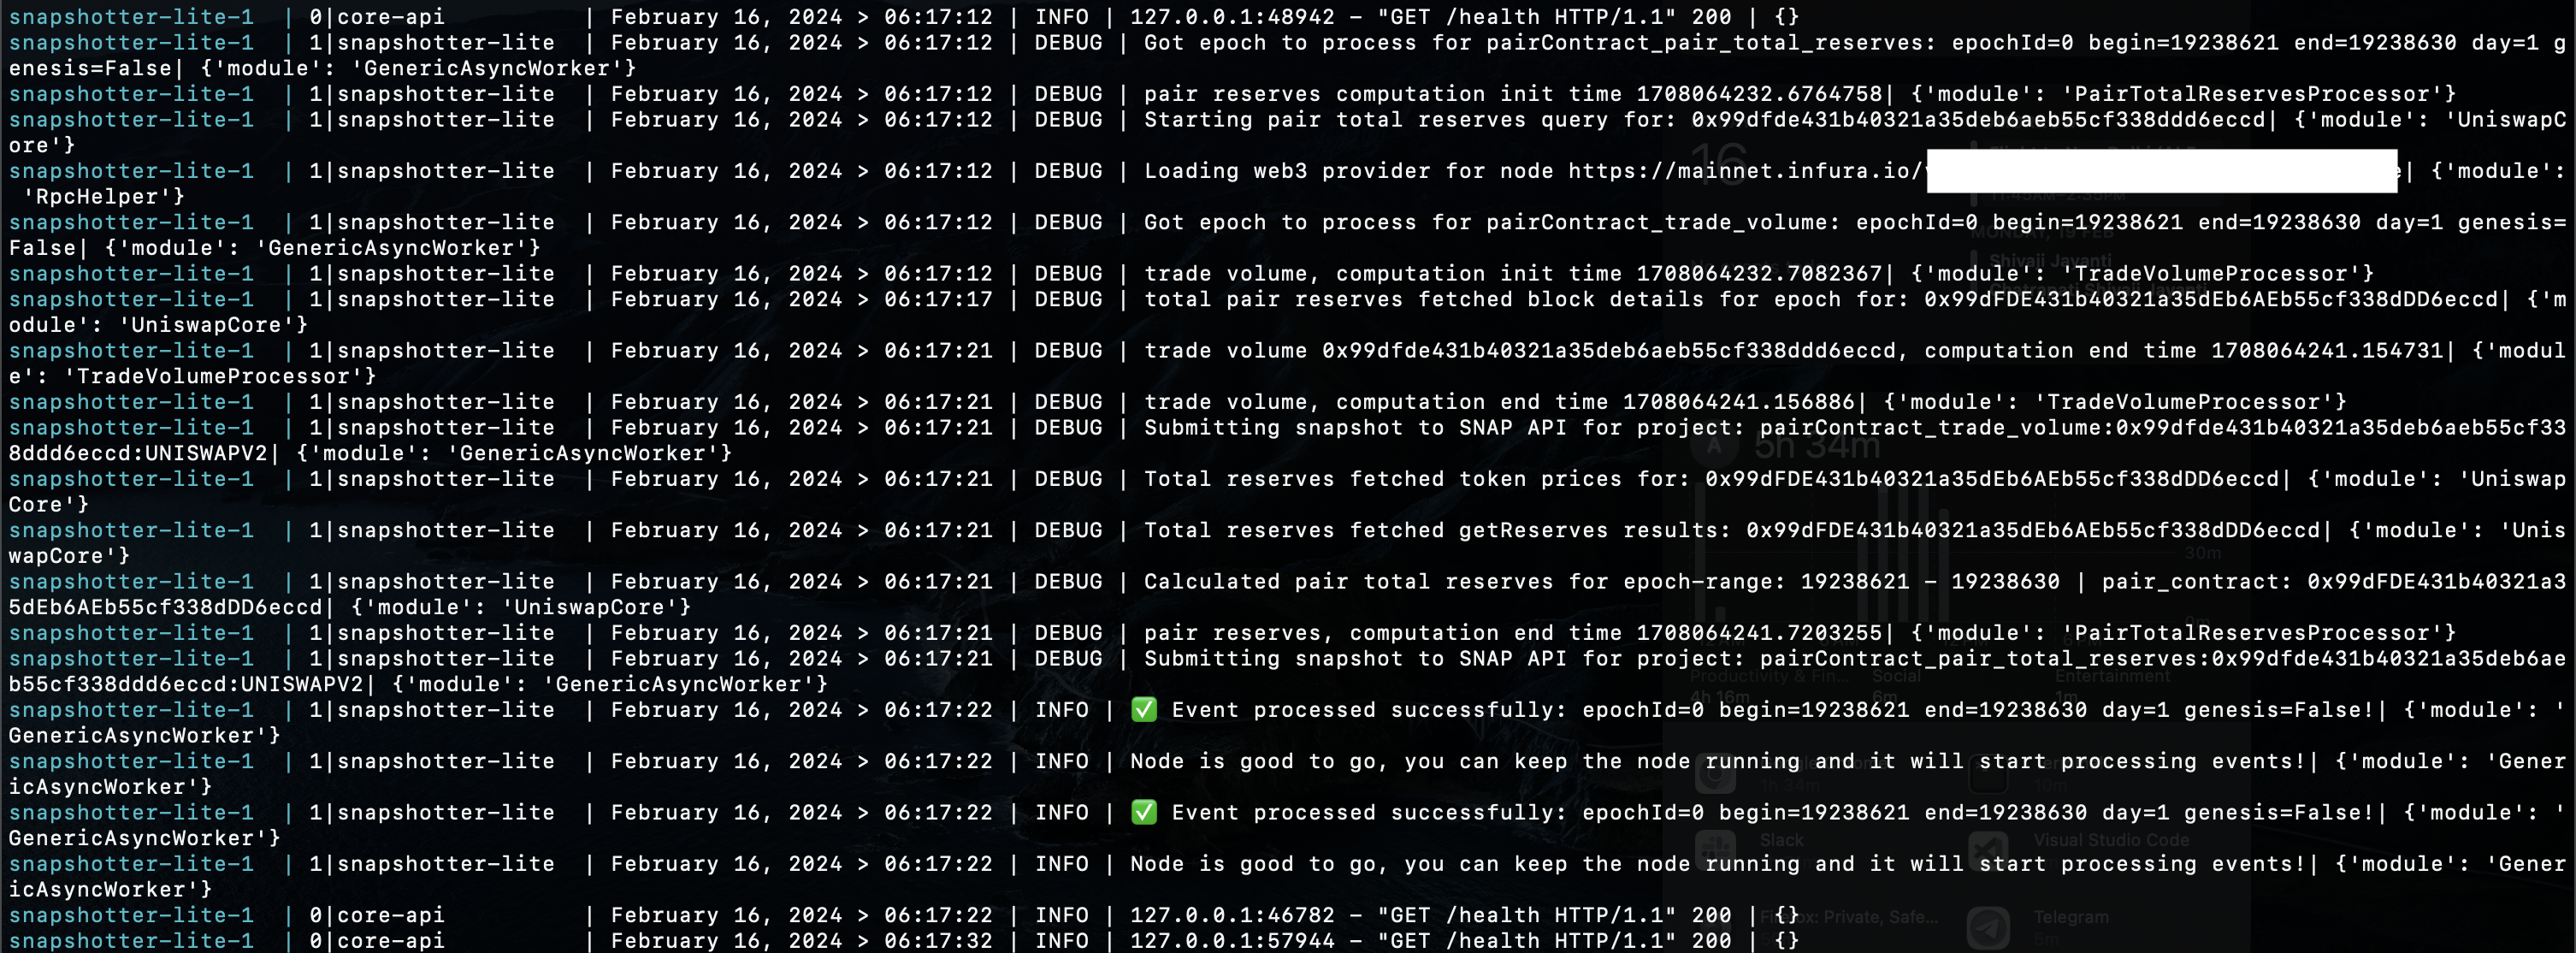
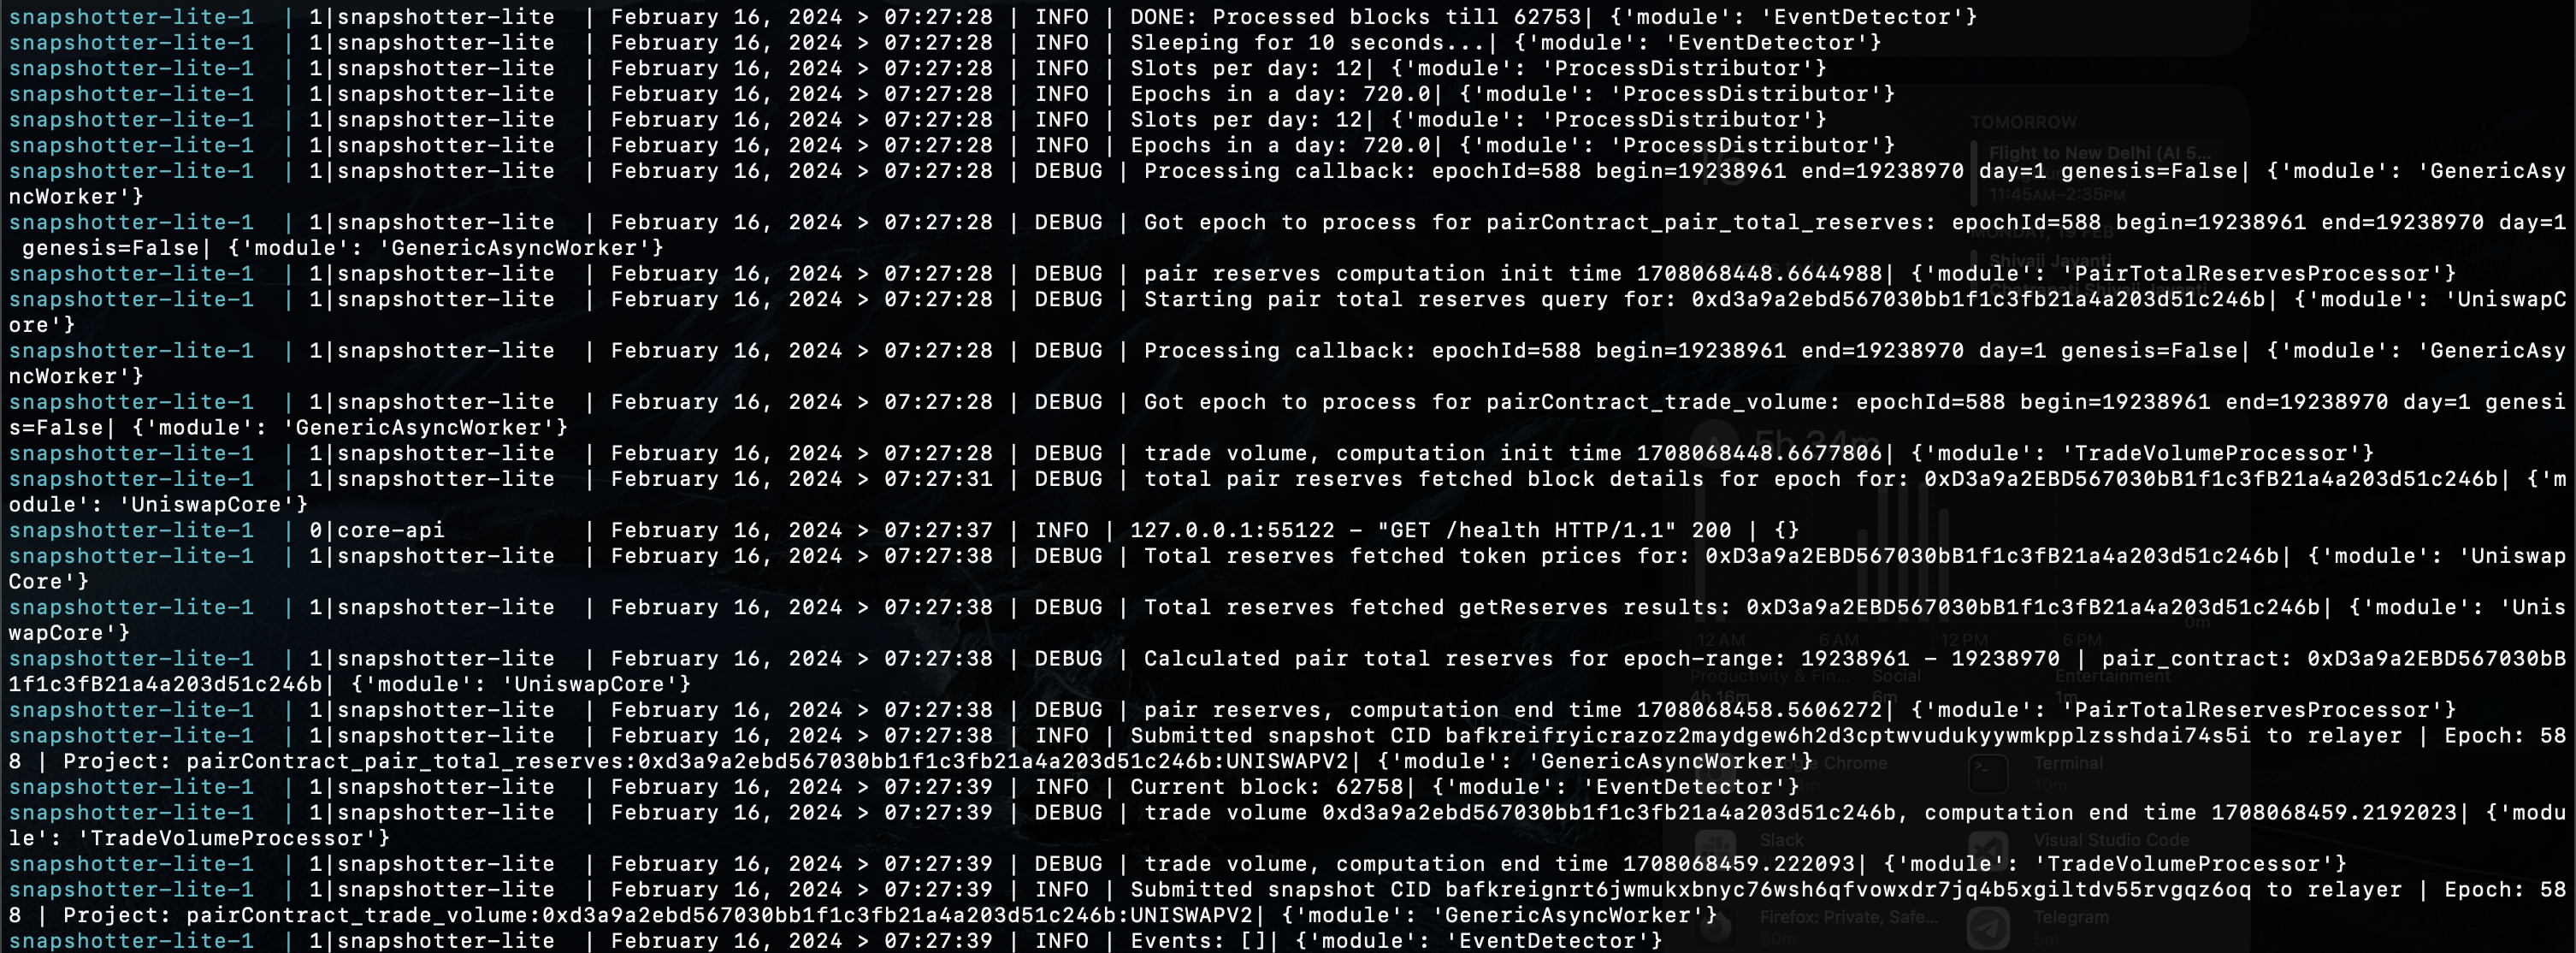
If your node is generating snapshots during the assigned timeslot, you should have similar logs in your terminal:
Step 6: Maintaining Your Node
Regular Updates: Keep your system and Snapshotter Lite Node updated by regularly pulling the latest changes from the repository and applying system updates.
Monitoring: Regularly check the status of your node and the VPS to ensure everything is running smoothly.
- Docker Setup
- Non-Docker Setup
Docker Setup for MacOS
Hardware Requirements
The Snapshotter Lite Node is designed for minimal hardware demands, allowing it to operate effectively on various setups, including both local systems and cloud-based Virtual Machines.
MacOS System Requirements
For users running the node on personal hardware, the minimum specifications are:
- RAM: At least 4 GB.
- CPU Core: Minimum of 2 Cores
- Disk Space: A minimum of 40 GB.
- Python: Ensure Python 3.11 is installed.
Pre-requisitie tools
Install Docker on your machine. You can find the installation instructions for your operating system on the official Docker website.
Install git if your system doesn't have git installed. To install git on MacOS, please follow this guide: https://www.atlassian.com/git/tutorials/install-git
Installation
- Clone the snapshotter lite repository using the following command in the terminal:
git clone https://github.com/PowerLoom/snapshotter-lite powerloom-testnet
This will clone the repository into a directory named powerloom-testnet.
- Change your working directory to the powerloom directory:
cd powerloom-testnet
1. Setting up Screen
The Screen utility allows you to run processes in the background, enabling you to maintain long-running tasks without keeping a terminal window open. To initiate a new Screen session for managing the Snapshotter Lite Node, follow these steps:
Enter the following command to create a new Screen session named "powerloom":
screen -S powerloom
- This command opens a new Screen session, where you can start the Snapshotter Lite Node.
- Once inside the new Screen session, initiate the Snapshotter Lite Node as required.
This approach ensures your node can continue running in the background, even if you disconnect from the terminal session.
2. Run the node
- Run
build.shin the terminal to start the snapshotter lite node:
./build.sh
Optional: Only for Developers
If you're a developer and want to play around with the code, instead of running build.sh, you can run the following command to start the snapshotter lite node:
./build-dev.sh
Please do not use your NFT minting wallet to run the snapshotter lite node. The safest approach is to generate and assign a burner wallet. You can generate a burner wallet through any of the tools listed below:
Once generated, make sure you assign your burner wallet to your snapshotter dashboard.
During the setup, you'll be prompted to enter the following values:
$SOURCE_RPC_URL: Use any Ethereum Mainnet RPC, such as Ankr, Infura, or Alchemy.$SIGNER_ACCOUNT_ADDRESS: Utilize a burner wallet for the signer account address. Please DO NOT use your main/primary wallet.$SIGNER_ACCOUNT_PRIVATE_KEY: Use the private key from your burner wallet.$SLOT_ID: To assign your node to a specific slot, please provide the corresponding Slot ID or NFT ID. You can locate your NFT ID within your transaction details on PolygonScan.
This is a one-time configuration process that generates a .env file in the project's root directory.
Everytime you restart the node, you should have a log message similar to the one shown below.
If your node is generating snapshots during the assigned timeslot, you should have similar logs in your terminal:
- To stop the node, you can press
Ctrl+Cin the terminal where the node is running ordocker-compose downin a new terminal window from the project directory.
This will halt the running node and all associated processes.
By following these steps, you can successfully configure the Snapshotter Lite Node on your Mac system.
If you encounter any issues while operating the node, please refer our troubleshooting section for guidance on common debugging techniques.
Non-Docker Setup for MacOS
Hardware Requirements
The Snapshotter Lite Node is designed for minimal hardware demands, allowing it to operate effectively on various setups, including both local systems and cloud-based Virtual Machines.
For users running the node on personal hardware, the minimum specifications are:
- RAM: At least 4 GB.
- CPU Core: Minimum of 2 Cores
- Disk Space: A minimum of 40 GB.
- Python: Ensure Python 3.11 is installed.
If you want to run the Snapshotter Lite Node without Docker, you need to make sure that you have Git, and Python version 3.10 or higher installed on your machine and we recommend to use python version 3.11.7. You can find the installation instructions for your operating system on the official Python website.
Optional: Installing Virtual Environment
Install miniconda for your system:
https://docs.conda.io/projects/miniconda/en/latest/
Verify the installation using the following command in your terminal
conda --version
Add miniconda to your path if the terminal does not identify conda as a valid command:
export PATH="/Users/yourusername/miniconda3/bin:$PATH"
Replace yourusername with your actual username
Create and activate a python environment:
conda create -n myenv python=3.11
conda activate myenv
Once python3 is installed, we can go ahead and run the lite node:-
- Clone this repository using the following command in the terminal:
git clone https://github.com/PowerLoom/snapshotter-lite powerloom-testnet
This will clone the repository into a directory named powerloom-testnet.
- Change your working directory to the
powerloom-testnetdirectory, open the terminal, and type:
cd powerloom-testnet
- Run
init.shcommand in the terminal to start the snapshotter lite node:
./init.sh
Please do not use your NFT minting wallet to run the snapshotter lite node. The safest approach is to generate and assign a burner wallet. You can generate a burner wallet through any of the tools listed below:
Once generated, make sure you assign your burner wallet to your snapshotter dashboard.
- During the setup, you'll be prompted to enter the following values:
$SOURCE_RPC_URL: Use any Ethereum Mainnet RPC, such as Ankr, Infura, or Alchemy.$SIGNER_ACCOUNT_ADDRESS: Utilize a burner wallet for the signer account address. Please DO NOT use your main/primary wallet.$SIGNER_ACCOUNT_PRIVATE_KEY: Use the private key from your burner wallet.$SLOT_ID: To assign your node to a specific slot, please provide the corresponding Slot ID or NFT ID. You can locate your NFT ID within your transaction details on PolygonScan.
This is a one-time configuration process that generates a .env file in the project's root directory.
- The node setup will be completed in approximately 2-3 minutes, after which the snapshotting process begins automatically.
Everytime you restart the node, you should have a log message similar to the one shown below.
If your node is generating snapshots during the assigned timeslot, you should have similar logs in your terminal:
Stopping the Snapshotter Lite Node
To stop the node, use the command in the terminal:
pkill -f snapshotter
This will halt the running node and all associated processes.
By following these steps, you can successfully configure the Snapshotter Lite Node on your Mac system.
If you encounter any issues while operating the node, please refer to our troubleshooting section for guidance on common debugging techniques.
- Docker Setup
- Non-Docker Setup
Windows Docker Setup
Hardware Requirements
The Snapshotter Lite Node is designed for minimal hardware demands, allowing it to operate effectively on various setups, including both local systems and cloud-based Virtual Machines.
For users running the node on a personal Windows system, the minimum specifications are:
- RAM: At least 4 GB.
- CPU Core: Minimum of 2 Cores
- Disk Space: A minimum of 40 GB.
- Python: Ensure Python 3.11 is installed.
Setting up the snapshotter node on Windows requires a few additional steps. We suggest using Docker for its ease and speed of setup. To begin with Docker, you must have the Windows Subsystem for Linux (WSL) installed. Please follow the guide provided below for detailed instructions.
Initial Setup
Open PowerShell:
- Start by opening PowerShell on your Windows machine. Search for
"PowerShell"in the start menu and launch it.
- Start by opening PowerShell on your Windows machine. Search for
Install Windows Subsystem for Linux (WSL):
- In the PowerShell window, enter the following command:
wsl --install - This command installs the Windows Subsystem for Linux, necessary for running Docker.
- In the PowerShell window, enter the following command:
Download and Install Docker:
- Download Docker from the official website.
- Follow the installation instructions provided on the website.
Restart Your Computer:
- After installing Docker, restart your computer to apply all changes.
Open Docker:
- Post-restart, open Docker. This should automatically launch a Powershell console which will have WSL installed.
Set Up Linux User Account:
- In the newly opened powershell console, set up a new user account by entering a username and password.
Granting Docker Permissions
Modify Docker Group Permissions:
- To grant Docker the necessary permissions, add your user to the Docker group with this command:
sudo usermod -aG docker $USER - Logout and login again or restart the Docker service for the changes to take effect.
- To grant Docker the necessary permissions, add your user to the Docker group with this command:
Verify Docker Installation:
- To confirm Docker is set up correctly, run:
docker run hello-world - This command should display a message confirming Docker is functioning.
- To confirm Docker is set up correctly, run:
Cloning the Repository and Running the Build Script
Clone the Repository:
Use the following command in WSL terminal to clone the Snapshotter lite node repository:
git clone https://github.com/PowerLoom/snapshotter-lite powerloom-testnet
Navigate to the Repository Directory:
Change to the cloned repository's directory:
cd powerloom-testnet
Run the Build Script:
Please do not use your NFT minting wallet to run the snapshotter lite node. The safest approach is to generate and assign a burner wallet. You can generate a burner wallet through any of the tools listed below:
Once generated, make sure you assign your burner wallet on your snapshotter dashboard.
Execute the build script with:
./build.shDuring the setup, you'll be prompted to enter the following values:
$SOURCE_RPC_URL: Use any Ethereum Mainnet RPC, such as Ankr, Infura, or Alchemy.$SIGNER_ACCOUNT_ADDRESS: Utilize a burner wallet for the signer account address. Please DO NOT use your main/primary wallet.$SIGNER_ACCOUNT_PRIVATE_KEY: Use the private key from your burner wallet.$SLOT_ID: To assign your node to a specific slot, please provide the corresponding Slot ID or NFT ID. You can locate your NFT ID within your transaction details on PolygonScan.
This is a one-time configuration process that generates a .env file in the project's root directory.
After entering the required information, the setup will begin to construct the Docker container, which should be ready within a few minutes.
Everytime you restart the node, you should have a log message similar to the one shown below.
If your node is generating snapshots during the assigned timeslot, you should have similar logs in your terminal:
By adhering to these instructions, you can successfully configure the Snapshotter Lite Node on your Windows system.
If you encounter any issues while operating the node, please refer to our troubleshooting section for guidance on common debugging techniques.
Setting Up Multiple Nodes on a VPS
If you're looking to run multiple nodes, you can use our Multi-node setup python script. This section will guide you through setting up and managing multiple nodes.
Clone the Multi-node setup script
First, clone our multi-node script to get started:
git clone https://github.com/PowerLoom/snapshotter-lite-multi-setup
Navigate to the directory & type the below command on your terminal:
```bash
cd snapshotter-lite-multi-setup
```
Setting Up the Environment
It is imperative to create an isolated virtual environment that includes the necessary Python version and modules. This approach ensures that the global Python installations on the VPS or your local machine are not altered.
Installing Pyenv
Follow the steps below to install pyenv according to your OS.
Open the terminal and execute the below commands.
- pyenv installation(Linux)
- pyenv installation(MacOS)
sudo apt install build-essential libssl-dev zlib1g-dev libbz2-dev libreadline-dev libsqlite3-dev curl libncursesw5-dev xz-utils tk-dev libxml2-dev libxmlsec1-dev libffi-dev liblzma-dev
After installing the packages, run the following command to execute the script for pyenv installation:
curl https://pyenv.run | bash
Next, add pyenv to the bashrc file:
cd
nano ~/.bashrc
Inside the nano editor, add the following lines at the end of the file:
export PATH="$HOME/.pyenv/bin:$PATH"
eval "$(pyenv init -)"
eval "$(pyenv virtualenv-init -)"
To save changes in the .bashrc file, press ctrl + o.
Refresh the terminal by typing:
source ~/.bashrc
Next, proceed to install Python 3.11.5:
pyenv install 3.11.5
Install pyenv with the brew package manager. Ensure you run an update before the installation.
brew update
brew install pyenv
Next would be to add the right initializations into your ~/.bashrc or ~/.zshrc file depending upon whether you use the bash or zsh shell. If you use any other shell, consult its documentation to know where the similar profile ~/*rc files are located.
The following example assumes a ~/.zshrc file.
echo 'export PYENV_ROOT="$HOME/.pyenv"' >> ~/.zshrc
echo '[[ -d $PYENV_ROOT/bin ]] && export PATH="$PYENV_ROOT/bin:$PATH"' >> ~/.zshrc
echo 'eval "$(pyenv init -)"' >> ~/.zshrc
Reload your shell profile in the terminal by running the command:
source ~/.zshrc
Next, proceed to install Python 3.11.5:
pyenv install 3.11.5
Installing pyenv-virtualenv
Execute the commands below to install pyenv-virtualenv:
git clone https://github.com/pyenv/pyenv-virtualenv.git $(pyenv root)/plugins/pyenv-virtualenv
echo 'eval "$(pyenv virtualenv-init -)"' >> ~/.bashrc
pyenv virtualenv 3.11.5 ss_lite_multi_311
pyenv local ss_lite_multi_311
Executing the Setup
To establish a multi-node setup, follow these steps:
# Prepare the .env file
./init.sh
# Install all Python requirements
pip install -r requirements.txt
# Execute the setup
python multi_clone.py
When you execute python multi_clone.py, you will see the following prompts that guide you through setting up your node(s).
- Terminate Existing containers: "Do you want to kill all running containers and screen sessions of testnet nodes? (y/n) n"
- Type
y. Use this option and stop all active containers or node instances. This will clean up all the older containers. Remember to cross-check your running containers before executing this command.
- Custom Slot ID Deployment: "Do you want to deploy a custom index of slot IDs (indices begin at 0, enter in the format [begin, end])? (indices/n)"
- For instance, to deploy the first four slot IDs as nodes, input
[0, 3], where 0 is the start index, and 3 represents the fourth element in the slot ID array associated with the wallet holder. If you want to deploy the entire array of slot IDs, typen.
- Deployment Batch Size: " Enter the batch size into which you wish to split the deployment"
- A batch size of 1 means nodes will be deployed one by one, in batch size of 1. A batch size of 2 takes two nodes at a time and proceeds with deployment, and so on.
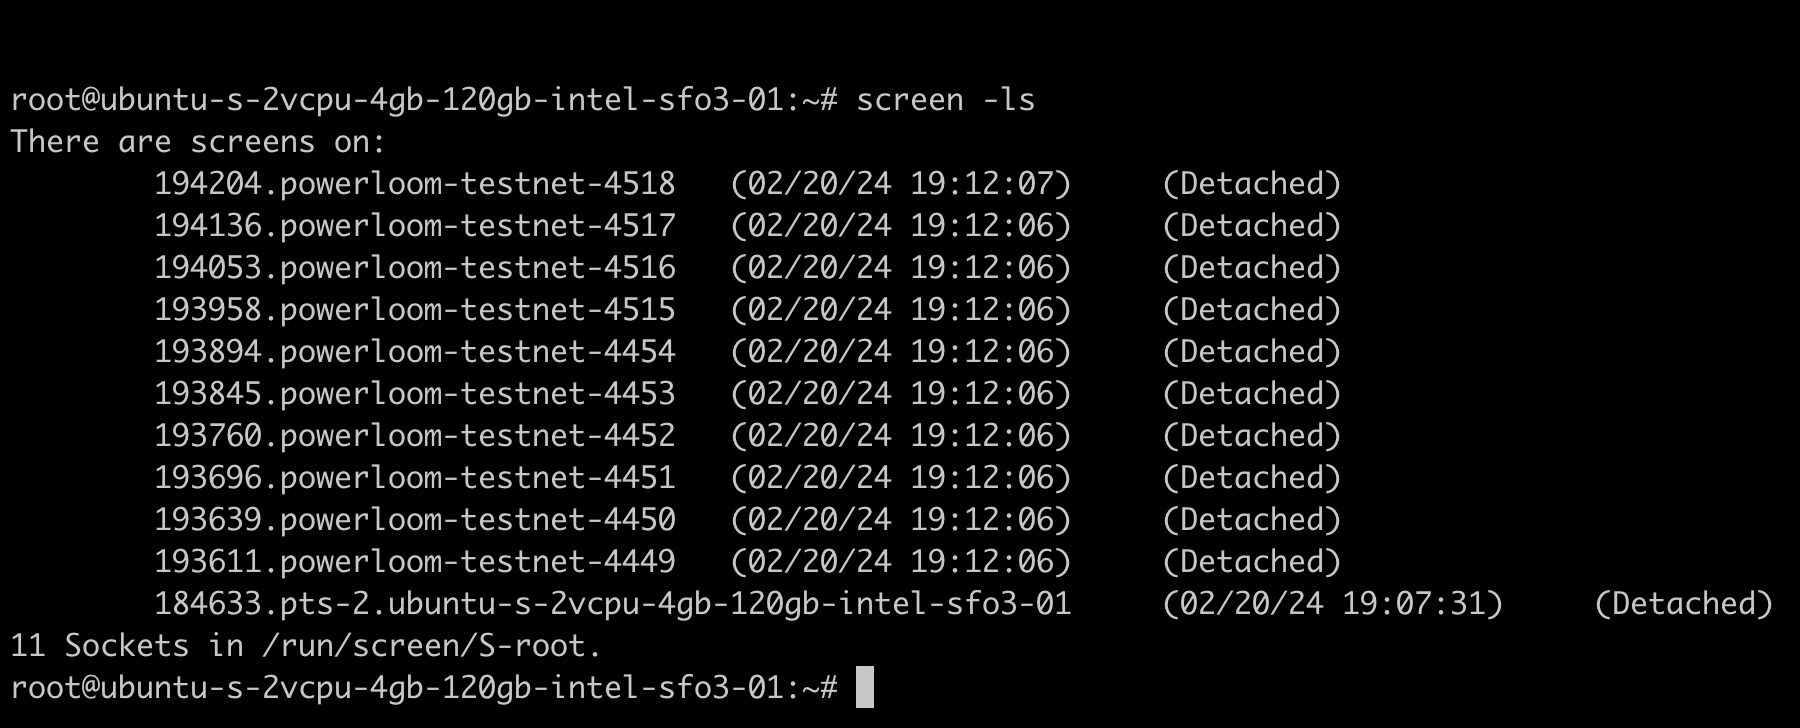
Following the setup prompts, the script will configure your node slots to run in separate screen sessions. To view the logs for a specific node slot, you can use the following commands:
To list all active screen sessions:
screen -ls
This command displays all currently running screen sessions.
To attach to a specific node slot's screen session and check its status, use:
screen -r <screenId>
Note: Replace <screenId> with the actual ID of the screen session you wish to access.
To detach from the screen session and leave it running in the background, press Ctrl + A followed by D.
For more instructions and further assistance, please visit our multi-node setup repository.
Troubleshooting
If you encounter any issues, please refer to our Troubleshooting section for more information.